Sunday 19 December 2010

Simplicity 3503 - the any time dress!

Looking through my stash last weekend I found a very nice piece of polyester lycra knit fabric that I had been saving to make a summer dress. But it suddenly occurred to me that perhaps the animal print colouring would be pretty good for this time of the year as well.

I think it works nicely with black tights and boots. As you can see, we’re experiencing some very snowy weather here in London!

Here’s a view of the back.

As you might have guessed it took me nearly as long to cut the dress out as it did to sew it together! At first glance, close up, the print looks like random dots but as soon as I took a long look at it I realised that the zig zags were very prominent and so it needed some careful cutting to match it all and make sure that the zig zags were straight. I cut all the pieces in a single layer and, in the end, I was pretty happy with the overall effect.

This is the pattern I used


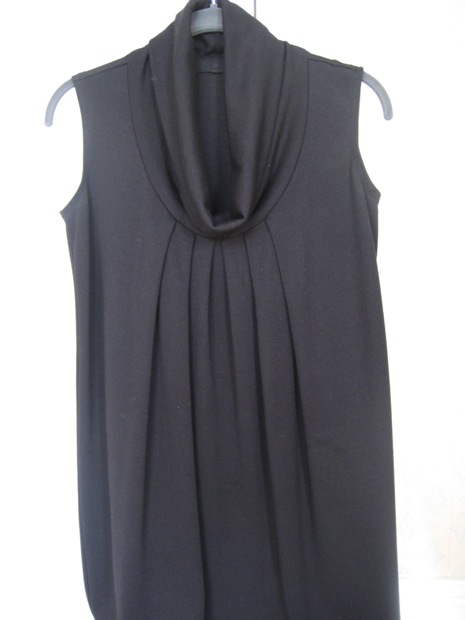
It’s not the first time I have made this pattern but my last version looked very different because then I made the sleeveless, maxi-length view (blogged about here), which turned out to be one of my favourite summer dresses and was perfect for hot weather. I kept meaning to make another one but this time I decided to give the dolman sleeve style a try and I really like it. On the pattern envelope it's the photograph at the bottom right but I didn't use a contrasting fabric for the midriff section, only for the neck band (being short I have to think carefully about cutting myself in half!). The dress is so easy and comfortable to wear and I love the flappy sleeves.

If you’re looking for a dress that can be worn very casually or dressed right up, I really do recommend this pattern. I can definitely see myself making a few more of these.

I think the next few days are going to be busy with gift wrapping and baking and festive decorating but I am hoping to get in a little bit of sewing to keep me from going Christmas crazy! I do hope your preparations for Christmas and your holiday season sewing are all coming together nicely?

Sunday 12 December 2010

Another Jalie top ...... with a little secret!

I’ve made myself yet another top from Jalie 2806, the wonderful top pattern that I like so much.


Now those of you that are familiar with this pattern must be a little puzzled because the pattern is for a variety of scoop neck tops, not a top with a draped neckline. But I’m going to reveal my secret


You see the top does have a scoop neck but in the first picture I am wearing it with a neck ring scarf, that I made from the leftover fabric. That way this basic top gets two different looks. Pretty neat, eh?

I found the instructions for making the neck ring scarf in the October issue of the Vogue/McCalls/Butterick pattern magazine – in the UK the magazine is called Sew Today but in the USA it’s still called Vogue Patterns. The neck ring is very easy to make. Basically you take a piece of leftover fabric (mine measured 60” wide by about 20” so is long enough to go round my neck twice), fold it in half lengthwise and sew the long sides right sides together but leave about 5” open at either end. Turn it right sides out. Then, also right sides together, you sew the short ends together (this is made possible because you have left the ends of the long sides open). Then hand sew the opening. Done!

Back to the top. This is actually the fourth time I have made this pattern but, guess what, this time I managed to screw up sewing the neck band on. It turned out to be horribly uneven, totally unacceptable! So I had to unpick all the serger stitching (yuk!) and cut another neck band. Fortunately the fabric of the top itself wasn’t too mangled. By taking a lot of care my second attempt at getting the band on was (almost) perfect. Which just goes to show – I should never get too complacent – it doesn’t matter how many times I’ve done something, it’s still possible to make a mess of it! Do you identify with that kind of mindset – “Oh this won’t take a second, I can do this in my sleep ………. whoops, what happened there?”

I haven’t been doing much sewing in the last few weeks, Christmas preparations have been top of the agenda, but I do have plans to get at least some sewing done before Santa arrives. So, more soon …..

Wednesday 24 November 2010

Finished - a festive dress from Vogue 8667!

In my last post I mentioned that I was making a dress, from Vogue 8667, and that I had some lovely fabric for it. What I didn’t mention, however, is that I didn’t have enough fabric to make the whole dress. You see I was walking through the fabric department of John Lewis (on the way to the electrical department – really, honestly, I wasn’t there to buy fabric at all!) when I spotted some lovely silk twill. Mesmerised I stroked it ……. until I saw the price tag - £40 (about US $60) per metre. Yikes!

But I really wanted it, the print and the colours were exactly what I wanted for a Christmas dress that would look festive without being costume. So I came up with an idea – I would make half a dress with this and the other half with something a little more reasonably priced. I think it worked out fine

I needed less than a metre of the silk twill for the bodice and I made the skirt part of the dress from some 100% English wool, purchased in the Goldhawk Road for £10 (about US $15) per metre. Actually, this is not the first time that I have made a two-fabric dress (I blogged about my Burda magazine dress in this post). With the right pattern, it’s a fun way of getting creative with fabric and being able to use some expensive fabric without breaking the bank!

So, here’s the back of the dress

The neckline is a little lower than the base of the neck and the back of the skirt is an A-line shape.

Here’s a reminder of the pattern envelope

I really love this pattern. It all goes together very well and, unlike quite a lot of dress patterns, it does give you instructions for the lining. Although I am now up to lining a dress without instructions, it was very helpful for the pleated skirt because Vogue provides a separate pattern piece for the skirt front lining so that, although the outer skirt is pleated, the lining isn’t, which cuts down on the bulk and allows the skirt to hang nicely.

I can definitely see me making this pattern again – next time I want to make one with the straight skirt and with that lovely collar. I do like patterns like this one that give you a lot of style options – it means that once you have got the fit sorted out you can turn out several quite different looking dresses very easily!

So, what about you - do you have plans for a holiday season dress?

Monday 22 November 2010

Japanese fashions and sewing people ....

On Saturday I met up with a couple of other London bloggers to take a look at the Future Beauty exhibition of Japanese fashion at the Barbican Centre. Karin from Making the Seam and The Fabulous Dr. E were my wonderful companions and I had such fun time. (I am sure that you are familiar with their blogs but, if not, do head over and take a look at the beautiful things they’ve been making).

The clothes in the exhibition were quite awe-inspiring and the technical skill and inventiveness of the designers was extraordinary.

Although many of the garments were a little impractical

If you get a chance to see the exhibition, do go, I highly recommend it.

It was so nice to meet some fellow Sewists and spend an entertaining and enjoyable afternoon talking about sewing. It got me thinking about how much I love people who sew. I have never met a Sewist that I didn’t like. I am wondering …. is it that sewing attracts nice people or is it that sewing turns everyone into a nice person? What do you think?

So, what am I sewing now? Well, much as I admired and felt inspired by the Japanese fashions, I am going for something a little less outré and more vintage than futuristic - a, hopefully, pretty looking dress for Christmas. This is the pattern, Vogue 8667


I am making the bodice without the collar and the pleated skirt and I’ve got some lovely fabric to work with. It’s progressing well – I’m loving this pattern. So, more soon ……

Friday 19 November 2010

Vogue classic pencil skirt finished!

Regular readers will know that my recent sewing activities have been aimed at building some winter wardrobe basics. So I had to make that classic essential - a black pencil skirt.

The pattern I picked out was Vogue 8603 (in case you are wondering, I am wearing it with the silk jersey top I made from Jalie 2806 blogged about in my last post). Here’s what the skirt pattern looks like

What this picture doesn’t show you, however, is the back view. The pattern gives the option of a gathered inset in the lower back. So, although my version looks pretty plain from the front, the back looks like this.

I do like a skirt that has a bit of back interest!

The lining is cut so that it is hand-stitched around the edge of the gathered insert, like this

The skirt is fairly simple to make and, as it has princess seams, it is not difficult to get a good fit. Next time I make this pattern I think I'm going to try the view with the gathers at the hips - I avoided this because I thought that extra fabric around this area might be unflattering but now I've made this skirt, I think that the side gathers would work.

One thing did puzzle me about this pattern, however, is the way Vogue tells you to do the waistband facing. Once you have constructed the skirt and the lining separately they tell you to pin the lining to the skirt wrong sides together and baste along the upper edges. Then they tell you to sew the facing right sides together with the skirt, then turn the facing to the inside and slipstitch to the zipper tape and tack at the seams. This means that the facing is only attached at the seams and is kind of loose inside. I’m not very experienced so perhaps their way is a good way? But I didn’t fancy it much.

Instead I decided to do away with the facings (as you can see in the photo above of inside the skirt). To be sure that the waist seam didn’t stretch out I sewed 1/4” seam tape to the inside of the skirt (along the seam line) before attaching the lining. I think that if you aren’t going to add facings this is an essential step to give the waist some stability. Then I just sewed the lining and skirt together along the top, right sides together, understitched the seam and flipped the lining to the inside.

I quite like having the skirt without facings – I think it gives a smooth line. I should mention that even if I had decided on keeping the facings, I still wouldn’t have done it the way that Vogue suggests. I would have sewn the facings to the lining to make one lining/facing unit and then sewn this to the skirt with the right sides together, along the waist seam. But that’s just me – you might like the way that Vogue advise doing it? Do you have particular feelings about facings?

Moving on, I’m feeling that I need a change from sewing separates so I’m planning on making a dress next - more on that soon …….

Wednesday 10 November 2010

A trio of tops - my love affair with Jalie continues ...

The arrival of my new cover stitch machine coincided with the discovery that my wardrobe is seriously lacking some basic long-sleeve t-shirts – an essential for the British winter. Because I was so pleased with my Jalie scarf collar top (blogged about here), I thought I would turn to Jalie for a simple t-shirt pattern. I picked out Jalie 2806 and thought it was so quick and easy that I whipped up three!

Here’s the first one – ‘the flower print one’ made in a rayon/lycra knit.

The pattern gives you a choice of necklines and sleeves that you can mix and match. Here’s the pattern envelope.


I made the gathered neck with three-quarter length sleeves. It’s very straight forward to make – the most difficult part is attaching the neckline band. You need to take a little care to make sure the gathers are distributed evenly and that you sew the band on so that the width is exactly right all the way round.

So, here’s the second one – ‘the Liberty print one’. (I’m not modelling this one – I mean, how many pictures of me in a t-shirt do you need to look at?!)

Because Liberty of London is so famous for its cotton lawn, you might not be aware that they also make knit fabrics, but they do. As it is a cotton knit, it isn’t drapey like the rayon knit and doesn’t have the same kind of stretch or recovery. But it makes a nice, beefy t-shirt that is good to wear with jeans and the prints and colours they use are interesting. I extended the sleeves to make them full length for this version.

Lastly, as I had got my confidence up by now, is ‘the luxury one’ made from a 100% silk jersey purchased from Gorgeous Fabrics.

This picture doesn’t really do it justice. The fabric has a wonderful lustrous sheen and drapes perfectly. The top works worn casually but also looks very nice and dressy with a skirt.

I am quite enchanted with my cover stitch machine. Of course it is perfectly possible to make hems on knits without one but I do like how the machine can so easily make a knit garment look professional. Here’s a close-up of the hem (both the outside and inside) on the flower print top

The triple row of stitching is on the outside and inside the looper thread ‘covers’ the raw edge. It looks super-neat and you can stretch it as far as the fabric will go without the stitches breaking. You can also do a double row of stitching, rather than a triple row if you want to (which is what I did for the other two tops).

So, now that I have some tops, my winter wardrobe building is going to continue with a classic black pencil skirt but more on that soon ….

Friday 29 October 2010

Burda Style magazine - the turtleneck top

Thanks to everyone for your very nice comments about my shiny black satin and lace ‘glamorous’ dress featured in my last post. However, I clearly cannot spend all my time drinking champagne at Claridges whilst wearing fancy outfits. No, I’m afraid that my everyday life requires something a little more basic. Cue the turtleneck top, pattern 121, from the September issue of Burda Style magazine.


This top turns out to be a nice cosy garment to wear with jeans, it keeps the winter wind from chilling my neck and, with a little bit of styling, it’s not totally boring. I particularly love the overlong sleeves. I used a rayon knit that is very soft and drapey but not too fine. And making this top gave me the opportunity to use my cover stitch machine for the hems (I am thrilled to bits with my new toy).

I think quite a lot of people have already made this pattern and I have no doubt that many more will be making it throughout the winter. It is shockingly easy to make. Here’s the technical drawing

It’s just a front, back and sleeves and there are so few instructions needed that even Burda have managed to make them not too inscrutable! I did depart a little from their instructions in that instead of adding 5/8” seam allowances I added only ¼” because I think that smaller seam allowances work much better when using a serger to construct a garment. Also, I attached the sleeves in the flat – i.e. before sewing the side seams. I decided this would be much easier than having to set them in afterwards.

Before I go, I must mention my trip to Yorkshire the week before last. If you ever get a chance to go to Yorkshire, jump at it. It is very lovely and I had a wonderful time. While I was there I bought some fabric in Leeds market


Firstly an African print cotton – it might seem a little bit odd to go to Yorkshire and buy African cotton but the lady who ran this stall had so many lovely prints that I just couldn’t resist. Next a remnant of purple knit fabric – there’s about a yard and it only cost £2.50. Lastly some very nice 100% English wool which is a sort of denim shade of blue with tiny black squares – I think this will make a very nice skirt.

I also visited Duttons for Buttons, in Harrogate. They claim to be the largest stockist of buttons in the UK and I believe them, it was a real treasure trove. I could have spent hours in there but I contented myself with about twenty minutes and just a couple of purchases. So, I bought some fabric I don’t need and some buttons that I don’t know what I’m going to do with. But I’m very happy with all my purchases and isn’t that what we sewists do when on vacation?

Have a great weekend everyone ….

Thursday 21 October 2010

Butterick 5520 - the shiny black dress - finished!

When I received a party invitation that said ‘dress glamorous’ I immediately thought of the black crepe back satin fabric that has been sitting in my stash waiting to be transformed into a special occasion dress. The pattern I decided on was Butterick 5520. I combined the black satin with some black lace and came up with this dress.

I used the black satin (purchased at Paron Fabrics in New York) for the main body of the dress, the sleeves are made from the lace (from Gorgeous Fabrics) that I underlined with a nude coloured silk satin (from a store in the Goldhawk Road in London). Here is a close up of the bodice


I lined the bodice and skirt with black bemberg rayon and the sleeves are lined in a nude colour – here’s a picture of the inside of the bodice.


As you may have noticed, I actually took the trouble to change the colour of the thread when I was understitching around the neckline so that there wasn’t a line of black stitching around the part of the neckline where the sleeves are (a small detail but it does make it look nicer inside). Once all the different fabrics were cut and the sleeves were underlined, this dress wasn’t very complicated or difficult to make up. Basically it’s a sheath dress with raglan sleeves but you can mix and match various fabrics to give it different looks. Here’s a reminder of the pattern envelope.
I decided against the peplum (although I do like that style) because I felt that, for a short person like me, there was enough going on with the shiny black satin and lace without breaking me up in the middle. I wanted to look sleek and shiny (you see I paired it with shiny patent shoes).

When my husband and I walked into the party (which was lavishly located at Claridges Hotel) there were a lot of very glamorous dresses being worn – I whispered to my husband that I bet I was the only one there wearing a home made dress! But I think it did just fine – I passed for ‘glamorous’ and the nice thing about making your own is that it fits right and no-one else is going to be wearing the same dress, (oh, yes, and it didn’t cost hundreds of pounds!).

As I mentioned in my last post, I am currently working on making some t-shirts so that I can put my new coverstitch machine through its paces but I took a little break from sewing to spend a weekend visiting friends in Leeds, (which is in Yorkshire, in the north of England). I bought some fabric, visited a wonderful button shop and fell in love with Yorkshire but more about that soon ….

Thursday 14 October 2010

Let's talk coverstitching and style advice .....

Look what has just arrived in my home

Yay, lucky me, it’s a Janome Coverpro 1000CPX! I’ve been getting into sewing knits recently and, although using my sewing machine and serger produces pretty good results I was, wistfully, telling my husband that to get really professional looking hems I need a coverstitch machine. Clearly not wanting to get into the whys and wherefores and technical details of exactly what a coverstitch machine is, let alone the comparative benefits of various models, he generously told me that if I could locate what I wanted, then it would be mine! (I think that my DKNY double knit dress, from my last post, that he likes so much helped my case here).

I found my machine at an excellent UK store called Sewing Machines Direct, it cost £369 plus they threw in a large kit of threads and several pairs of scissors and they do next day delivery (and tell you the hour it’s going to arrive!). So, I’m just getting the hang of using it (it’s actually pretty straightforward) - here are my attempts at a triple coverstitch and a wide double coverstitch


A bit wobbly but not bad for a first attempt - I love that you can stretch the fabric as far it will possibly go and none of the stitches pop! I am very happy with this machine, although I do realise that I’m going to have to make an awful lot of t-shirts to offset such extravagant expenditure! So, my friends, what I want to know is – have you got a coverstitch machine on your wish list or do you already own one? What model do you have and do you think you get good value from it? Do you have any great coverstitching tips for me?

By the way, I am very proud and flattered to be able to tell you that style advice from me is now being taken up by New York’s sewing elite. I just casually threw a sartorial suggestion over to Peter, author of the world's most popular men’s sewing blog, and did you see what he made of it? Check it out here. Fabulous! Stick with me and you, too, could achieve such casually sophisticated glamour.

In the meantime, I have finished my Butterick dress and will be posting about that as soon as I have got some pictures. Then, I guess, I see some t-shirts in my very near future.

Friday 8 October 2010

It's fast, it's easy and it's DKNY!

If you’re in a hurry for a designer dress, Vogue 1179 is a great way to go, this must be one of the fastest dresses I’ve ever made.


Black is always tricky to photograph - the above picture gives you an idea of the general shape but not the detail so here is a close up so you can see how the pleating at the front looks.


The fabric is a double knit (purchased from Gorgeous Fabrics) which hangs very nicely but is substantial enough not to be flimsy. Here’s a reminder of the pattern envelope


This is one of the few garments I have made without first making a muslin – I just dived straight in. Halfway through cutting it out I did have some misgivings – I had a nasty suspicion that it was going to turn out to be a shapeless sack but, although it is certainly loose fitting, I do think there is something about the cut that makes it work – Donna Karan certainly knows her stuff!

A couple of the reviewers on Pattern Review have mentioned the tightness of the armholes – and I think they’re right. Usually I have to raise armholes by about an inch (I think I have freaky arms and shoulders!) but this time I didn’t and I really like the way they fit. I did as the pattern recommended and sewed clear elastic round the armholes and they don’t gape at all. But if you want to make this dress and you have regular arms you might want to lower the armholes a bit!

I followed the instructions exactly except where they tell you to sew the side seams before attaching the collar. I decided to attach the collar first because that way I would get a better idea of how the dress was going to hang and fit (because I could undo the basting for the pleats at the front) and could then adjust the side seams if needed.

When I finished this dress I thought that this was going to be one of those garments that I liked but my husband wouldn’t be so keen on but, somewhat to my surprise, he loves this dress – it’s turned out to be a real winner in his eyes!

Before I go, here’s a question, what do these fabrics have in common?


Answer – they are all being used in my current project, which is this pattern, Butterick 5520.
I am making the view on the right. The fabrics in my photo are (from left to right) lace for the sleeves, nude colour silk satin underlining for the sleeves, black silk satin for the body of the dress, nude lining for the sleeves, black lining for the body of the dress. Phew – that’s some cutting out to be done – this one isn’t going to be as fast as the DKNY dress!

More soon ……

Wednesday 29 September 2010

Jalie 2921 scarf collar top - finished!

So, here I am in my Jalie scarf collar top.

This is the first time I’ve made a Jalie pattern and I have to tell you that I am super-impressed. I thought I was probably on to a good thing because this pattern has 33 reviews on Pattern Review and patterns are usually popular there for a very good reason. Here’s what it looks like


I like the style because although it’s got the comfort of a knit top, it’s a little dressier than a basic t-shirt. The fabric I used is rayon with some silk in it – it’s very drapey and quite sheer but ok to work with.

When I first noticed (and I do mean noticed because it’s in very small print!) that the seam allowances were only ¼” I was rather alarmed. Being used to the usual 5/8” that the big pattern companies allow I was fearful that there just wouldn’t be enough to work with – but, I have to admit, I was completely WRONG. I loved how it all just slotted together and whizzed through my serger without any trouble at all. I think that from now on I’m going to trim all seam allowances for knits to ¼” – it makes attaching the sleeves so much easier!

Of course, I have to mention the neat burrito technique for attaching the collar! The instructions had me thoroughly intrigued – I just couldn’t fathom out how it was going to work. For those who haven’t got this pattern it’s a bit difficult to explain but basically you have to roll the front and back inside the collar and sew around the collar with the top inside it. But I had faith – after all, I told myself, 33 Pattern Reviewers can’t be wrong. I meticulously followed the instructions, being very careful to get the right side and the wrong side the right way round (if you know what I mean) and, yes, it worked. It was so exciting when I fished the top out of the 1” gap at the end of the collar and the seam allowances were all neatly enclosed inside.

I think I’m definitely nuts about knits at the moment because next on the cutting table is this one,

Vogue 1179, which I’m making in a black double knit (another thing I'm nuts about at the moment!). More soon ……….

Saturday 25 September 2010

10 things about me .......

I am very honoured to have been nominated to receive the Beautiful Blogger award

by three very beautiful bloggers, who you must go and visit: Vanessa from Sew Filled to the Brim, Gail from My Fabrication and Trudy from Sewing with Trudy. My heartfelt thanks to all three of you. I should also offer my apologies for taking so long to respond, life has been rather hectic this week (perhaps I should have been nominated for a Bad Blogger award instead?)

I am now supposed to tell you ten things about me:

1. I love to cook. I have over a hundred cookery books but I think that my favourite one is Kitchen Sense by Mitchell Davis –

it’s not particularly glossy, it doesn’t have any pictures but his recipes have never failed me. (Trudy - you said you didn’t like to cook but this might be one to try?)

2. I don’t know a lot about opera but I do love to go. Some years ago my husband took me to the famous Salzburg Opera Festival (in Austria) – which was wonderful. (Vanessa – this one is for you because this is where your favourite movie, The Sound of Music, was filmed). Here is a picture of me with Salzburg and the Sound of Music hills in the background.

3. I also don’t know much about sport but in the year 2000 my husband and I were lucky enough to be invited to the Olympic Games in Sydney. It was AMAZING. (Gail – your home town is a wonderful city!)

4. I can’t sing. Simon Cowell would have me off any stage in double fast time!

5. I have a huge shoe collection built up over many years. I am trying to cut my shoe buying habit right down but that’s not been working out too well.

6. When I’m not reading sewing books or magazines I like to read novels. One of my favourites is Dombey and Son by Charles Dickens.

It has it all – high drama, love, pathos and comedy.

7. I don’t much like exercise but recently I have taken to going for a brisk walk every morning before breakfast and I actually quite enjoy it.

8. I have never made anything in plaid. Of all the things you have to do to make a garment, cutting out is my least favourite so I always shy away from anything that makes this task more complicated. That said, I do love plaid fabric so, one day, I really must take the plaid plunge.

9. Nor have I ever attempted welt pockets, despite me saying some months ago, on this very blog, that I wanted to try. Must try harder!

10. I love to sew. Oh, but maybe you knew that one already.

I am going to duck out of the passing this award on except to say that, if you are a blogger, YOU are beautiful and I would love to know 10 things about you.

On the sewing front, I have finished the Jalie scarf collar top (what a great pattern this is!) and will post about it as soon as I’ve got some pictures. Until then, have a great weekend everyone.

Friday 17 September 2010

Another Simplicity 'Amazing Fit' dress finished!

I’ve plunged into my fall/autumn sewing by making myself an essential wardrobe staple – a little black dress.

I used what is rapidly becoming one of my favourite patterns – the ‘Amazing Fit’ dress, Simplicity 2648. My first version, blogged about here, was in a vivid orange. This time, hurrah, I remembered to attach the belt so I could make use of a nice looking black buckle that I have had in my stash for a while. Here’s a close up of the belt and buckle.


The fabric is a double knit, purchased from Gorgeous Fabrics. This is my first time working with double knit fabric and I have to tell you that I LOVE it. I really like how you can use it for a pattern that is designed for a woven but it has a nice bit of stretch and doesn’t wrinkle or crease. You can put it in the washing machine and it’s so practical and comfortable, great for travelling. You can use it to make a casual looking dress or even something quite dressy and smart. Also it’s easy to sew with. I’ve been asking myself, why have I never used it before?

I made the orange version of this dress unlined, as per the pattern instructions, which worked out fine but I did have to give the neck and armhole facings a really fierce steam pressing to keep them lying flat. For this version, as the fabric wouldn’t have taken well to a hot steaming, I decided that I would do away with the facings and line the bodice with a thin tricot. That way I got a clean finish with the edges but also kept the stretch factor of the double knit. Here’s a picture of the inside of the dress.


So, autumn garment number one has been completed and I think it’s going to be a very useful wardrobe basic!

Next up is the Jalie scarf collar top. I have seen lots of gorgeous versions of this top, and I am fascinated by the construction technique for the collar, so I am really keen to give it a try. I have cut it out in a lovely deep pink rayon and silk jersey. More soon …….

Tuesday 14 September 2010

The coat chronicles continued .....

A big thank you to everyone who commented on my dithering over the Lady Grey coat pattern in my last post. Your extremely astute opinions helped me clarify what I really felt about my dilemma. The overwhelming consensus was, at the very least, proceed with caution! Some said don’t do it at all. Whilst I am not saying that I’m never going to make it, I have decided that I am definitely not going to make it now. I shall, however, be following the Sew-Along with keen interest and envious admiration.

I do love the pattern but, as I am small, top heavy, short-waisted and not particularly thin, I really don’t think this is the style for me. I have to confess, however, that I don’t always follow the ‘rules’ when it comes to determining what I might look good in and what I want to make. For instance, it is often advised that small ladies should avoid full length dresses and large prints, yet one of my favourite dresses is my maxi dress, made from Simplicity 3503 (blogged about here and here). It’s long and the print is huge. I totally agree with the advice that The Slapdash Sewist offered me: “if you're comfortable in what you're wearing, you'll look good. So just *decide* it's going to flatter you and it will”. I think that is very true of my maxi dress – it doesn’t really matter whether it actually flatters me or not because every time I put it on it makes me feel cool and carefree and makes me smile!

So I don’t mind taking risks when deciding what to sew but I’m not in the mood to do it with a coat. A coat is a lot of work and takes up a lot of space in the wardrobe so I want a coat that I am going to be able to wear often and always feel good in. Lindsay T commented that she felt I would “look better in a more streamlined and classic style”. As soon as I read that I thought YES, that’s what I really want – streamlined and classic is what my wardrobe needs. So I have been looking through pattern catalogues and my collection of Burda magazines to find something that fits the bill and have found some promising contenders.

Still obsessed with the idea of my coat being camel, I set off for the Goldhawk Road to do some research on cost and availability of camel coloured coating. I went into most of the stores before finding exactly what I wanted. My credit card came out and what was supposed to be a research mission turned into a buying trip. Here it is, pictured with the reference books I have been studying in preparation for the task!

It’s 100% wool, beautifully soft and is a delicious melted toffee shade. It cost £12 per metre.

So, last week I had a coat pattern but no fabric. Now I have the fabric but no coat pattern!

I have to tell you that I am quite exhausted by this coat before I have even begun so, for now, I am going to turn my energy to making a few less demanding items of clothing to get my autumn wardrobe going. After all, I am going to be needing something to wear underneath this coat, when it finally gets made!

In the meantime, what about you - do you know what ‘the rules’ for your particular body shape are? Do you care?

Thursday 9 September 2010

Is the Lady Grey for me?

For the last week or so I have been eagerly waiting for my Lady Grey coat pattern to arrive from Colette Patterns so that I can count myself in on Gertie’s coat sew-along. Finally, hurrah, it arrived today.

But, here’s the thing. Despite the delightful anticipation, despite my great interest in other people’s preparations for the task, I have been harbouring a few doubts. Is this Lady the one for me?

I would like to be part of a sew-in and I think that this one is going to be especially fun. The coat oozes style – that big collar, the flared skirt and wide sleeves are definitely eye-catching and I love them. However, those are the very things that are making me hesitate. I am short and easily swamped so, if I’m honest, I'm not sure if this would have been my first choice for a coat pattern to flatter my figure. I have looked at the pattern pieces and can see how I could reduce the lapels, the collar and the flare but I don't think I want to do that - wouldn’t I then actually be making a different coat? It is those style elements that make this coat distinctive. I like the look. Hmmm it’s a conundrum.

In the meantime I have been pondering on fabric. My first thought was to go for classic black – you can’t go wrong with a black coat. But then I was in the hairdressers (getting my highlights done – lot of time sitting about!) where I thoroughly perused the September issue of Vogue and I discovered that this season’s colour for coats is CAMEL. Those fashion-savvy people at Vogue say: “Invest in a classic camel coat and we guarantee you’ll wear it forever”. With that in mind I’m going to check out the discount fabric stores in the Goldhawk Road (London) to see exactly how much I’m going to have to invest to get 4 ¼ yards (oooh she’s a fabric hungry lady!) of camel wool for this coat.

I have to say that the thought of a coat in delicious caramel shade of camel – all expensive and elegant looking – is getting me quite inspired.

Also I must mention that along with the Lady Grey I ordered the Rooibos dress pattern and, I have to tell you that I’m definitely excited by it – I think this one (made a little longer than the model is wearing) is ‘me’. It’s gone straight into my autumn ‘to do’ pile.


In the meantime, what do you think of the prospect of me in a camel Lady Grey – at 5ft 2” am I too small to carry it off? Help, I'm in a frenzy of indecision ......

Friday 3 September 2010

The thrill of a frill - Simplicity top finished!

Bearing in mind my weakness for frills and ruffles and my great liking for patterns that offer separate pieces for B, C or D cup sizes, I really don’t know why I didn’t get around to making up Simplicity 2599 earlier. This pattern has been sitting around in my stash since it was issued last year – as soon as I saw it I leapt on it. And I’ve had the coral coloured silk I planned to use for it since the spring of this year. All summer I kept meaning to make it but, somehow, it never reached the top of the pile - until now. But, as they say, better late than never and here it is

In case you’re wondering, I’m wearing it with the skirt I made from the April issue of Burda Magazine (blogged about in this post). So I’ve got ruffles at my neck, a flounce round my hem and a bow at the back! Is that too much?

The top is pretty easy to make but the ruffles do take a bit of fussing with to get just right, especially with a slippery silky fabric. As I mentioned in my last post, I tried out a new technique to make this easier and did the gathering of the ruffles with my new best friend, my serger. This way the ruffles get the edges finished at the same time as the gathering threads are put in – you then just pull up the needle threads to adjust the ruffles to the exact length you want them and sew them to the front. Here’s a close up of the ruffles

And here’s one with a ruffle lifted up so you can see how it is attached to the front.

At the back of the neck there is a button and loop closure. If you want to make this top quicker you could actually do without this (I can take the top on and off without undoing the button). However, I like the elegant look of the closure and I found some cute looking rose shaped buttons in my button box (I have no idea where they came from – do things mysteriously appear in your home?!), so I used one of them


I think that this pattern is definitely worthy of another outing at some time in the near future but, in the meantime, I’m starting to think that summer sewing has to stop now …… I need to do some serious planning for my autumn (fall)/winter wardrobe.
Related Posts Plugin for WordPress, Blogger...