Thursday 27 May 2010

June Burda Magazine, skirt #112 – finished!

The latest edition of Burda Magazine arrived on Sunday morning and I decided that this month, instead of deliberating, I would just plunge right in on my favourite. Pattern 112 called to me, I happened to have a metre of linen in my stash, so here it is


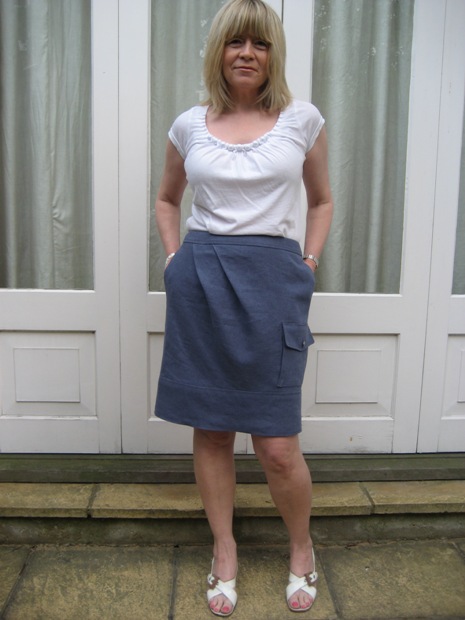
I liked this pattern because, although it isn’t difficult, there’s quite a lot of interesting things going on with it. It has inseam pockets, pleats on one side of the front, a pleated patch pocket with a flap and a hem band. I really enjoyed making this one. Here’s the line drawing

I have to confess that Burda’s instructions for the inseam pockets had me slightly puzzled at first. When sewing this kind of pocket in the past I have sewn the pocket pieces onto the back and front skirt pieces then sewn the side seams and round the pocket all in one. Burda have you sew the side seams first (but not across the pocket openings) then you attach the pocket pieces to the seam allowances, then you sew the pocket pieces together. I like to try new things, so I did it their way and, what do you know, it worked out fine!

I did, however, depart from Burda’s instructions when it came to the hem band. The pattern tells you to cut the band with a 4cm hem which you are supposed to sew in place by hand. I decided it would be neater and give the bottom of the skirt more body if I cut the hem band so that it was double the finished depth plus seam allowances. I attached it right sides together to the skirt, folded it over to the inside and stitched it to the joining seam. Inside the skirt looks like this.

I should also mention that I added an inch or so to the length – I can’t quite carry off a very short skirt anymore!

My other pick from the June Burda magazine is this tunic pattern

I like the neckline and the neat little pleats at the front. But I won’t be making this one just yet because next on my list is a dress from Vogue 8555…………….. more on that soon!

Friday 21 May 2010

Vintage Simplicity, Liberty print dress - finished!

I have completed my first vintage dress project, made in a Liberty print silk and I’m pleased that it has turned out pretty much how I wanted it to look.

I think this is just the kind of dress I need to wear when taking ‘afternoon tea and cakes’ (that’s an English thing!!) on sunny days (they’re not so much an English thing!!). Here’s a reminder of the pattern I used, it’s dated 1968.


Simplicity describes it as a ‘Simple-to-Sew’ Jiffy pattern – 3 main pieces (front, back, sleeve) plus the bow and facings. Of course I ‘un-Jiffied’ it by adding a full lining. Being a double silk the fabric isn’t very flimsy but I still felt that this dress needed a lining. I used a Bemberg rayon in a pretty colour called Geranium. I cut the lining using the main pattern pieces, then assembled them with the back and front neckline facings to make one lining/facing unit. I sewed this right sides together to the neckline of the dress, flipped it over and hand stitched the lining to the hem of sleeves and to the zipper. To be honest I have no idea if this is the ‘right’ way to line this kind of dress but it seemed to work out fine. It looks like this.


I loved the pattern. As it comes in one size only, both the cutting and sewing lines are printed which means you can see exactly how it’s going to come together. The instructions were super-clear and easy to follow and the vintage half sizing saved me having to do my usual petite adjustments.

So what’s next? I have no idea – I have so many patterns and fabrics in my pile of ‘things to make this summer’ that I am in a frenzy of indecision. However, right now, as today does happen to be a sunny day, I’m off to take tea ……..

Friday 14 May 2010

I'm venturing into vintage!

As if I haven’t got enough current patterns in my stash, I have recently acquired some very nice vintage dress patterns. I thought that I would make a start with this ‘swinging sixties’ little shift dress, complete with neck bow.

I have pictured the pattern with the fabric that I am using – a Liberty print, double silk, called ‘Broadwick Flutterby’. This 2 metre piece of fabric was a super-lucky find at the bottom of the remnants bin in the Liberty store during one of their sales, at a cost of £19.98 (about 30 US Dollars), which is an excellent bargain. I am thinking that the overall effect should be very similar to View 2 (the one on the right on the pattern envelope above).


As it turns out, the sizing of this pattern is (almost) just right for me. It’s a Half Size – which my vintage Simplicity Sewing Book (dated 1958) tells me is “designed for a fully developed figure, shorter than the Miss-Woman, with larger waist, narrower shoulders”. Does that mean short and fat? Well, whatever, it fits my figure type rather well.

My flat pattern measurements told me I still needed to do an FBA and, after making a muslin, I raised the armholes to give me a bit more arm movement but then I was good to go. So, wish me luck, my first vintage dress is now under construction and I’m hoping to show you a picture very soon ………..

Friday 7 May 2010

Cynthia Rowley top - finished!

Rummaging through my pattern stash last week I came across this Cynthia Rowley pattern (Simplicity 2584) that I meant to make last year but somehow never did.

On a whim I pulled it out and got started on it straight away. Here’s the result -

To be honest, I think that I made a bit of an error in choosing such a busy print because the lovely shaped yoke, which is the main feature of this pattern, is a little lost. I should have used a plain fabric, or used a contrasting fabric for the yoke, or piped the edges to make it stand out more. However, I did use some heavy topstitching to help define it and, close-up, you can just about see the yoke shaping -


Apart from that, I do really like this top and I definitely recommend the pattern. Although it has a designer label it was very quick and simple to sew and I liked the way that the yoke is lined which makes it easy to construct accurately. I think that the cut is just right in that it’s not tightly fitted but it does have some shaping. Another thing I should mention is that I left off the zipper (I seem to be going through a phase of doing this because I did the same on the last top I made). I actually have nothing against zippers and am quite happy putting them in anywhere that needs one. However, with this pattern the zipper is supposed to be decorative, so you need a novelty zipper but I didn’t have one and couldn’t wait to get one. So, as the top goes on over the head quite easily, I just sewed up the centre back seam.

I definitely want to make another one of these quite soon but I shall choose a fabric that will showcase the yoke a bit better. In the meantime, however, I have acquired a few vintage dress patterns recently and I’ve decided that one of these is definitely going to be next on my list. So, more soon …
Related Posts Plugin for WordPress, Blogger...