Monday 14 November 2011

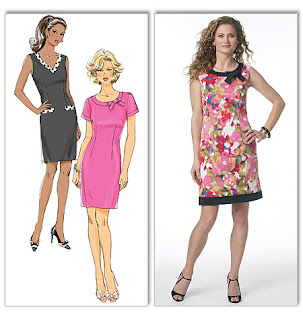
Butterick 5602 - the shapely shift!

As my last two makes were useful wardrobe basics I gave myself permission to indulge myself with another dress – I just love to make dresses! Since finishing my Chanel inspired dress (blogged about here) I have been eager to make another version of the pattern. Here’s what I came up with

Butterick 5602 shift dress

This is the pattern

Butterick 5602 pattern envelope

Last time I made the one with sleeves, this time I made the version pictured on the right (but without the bow at the neck – it’s not that I don’t like bows, I do, but I just didn’t want a bow on this).

The fabric is a wool challis, called ‘Stingray Frieze’ purchased from Vogue Fabrics. I love the print and it has a beautiful (in the words of Vogue Fabrics) “featherweight weave” and “alluring drape” - it certainly is lovely and light to wear. I used a plain black wool challis for the neck and hem bands and I lined it with my favourite bemberg rayon lining.

There’s not a lot else to say about this pattern – it’s a simple shift dress, nicely shaped and fairly fast and easy to make. So, moving on, I’m going to reveal what I’m working on right now, which is this skirt from the October issue of Burda Style.

Burda Style October 2011 #119

Despite liking lots of patterns in Burda Style magazine I haven’t actually made one for a while. I think that what has been putting me off is that since they have been printing twice as many patterns on each of their pattern sheets it is a REAL PAIN to trace them. (Hello, people who run Burda Style – did you hear that?) But I bit the bullet and got on with it. However, I do have a tip to make it a little easier. Before you lay the tracing paper on the pattern sheets, take a brightly coloured highlighter pen and go over the lines for each of the pattern pieces in the size that you want to trace.
 
The pattern pieces I want are highlighted in yellow

If you do this, it is much easier to identify through the tracing paper the lines that you should be following. It’s still a pain, but not quite so bad! Now the worst bit is over, the skirt is coming along nicely. So, more about that soon …

Saturday 5 November 2011

Black jeans and a flower-power t-shirt!

Much as I would like to spend my time making Chanel inspired dresses (see my last post) I really felt that it was time to get down to creating some autumn casual basics. And for that, of course, you can’t beat jeans and a t-shirt.

Vogue 8536 & McCalls 5894

When making this outfit I was aiming for a casual but ‘put-together’ look. For the jeans I chose a black cotton lycra twill fabric, it’s sturdy but has some give for comfort. I added brass rivets and a brass button

Black jeans with brass hardware

The pattern is McCalls 5894 – it’s the second time I have used this jeans pattern, so for more about the pattern, and my tips for making jeans, check out my earlier post here.

The t-shirt is made from Vogue 8536

Vogue 8536

I have to say that I LOVE this pattern, it has some great shaping. What the pattern envelope pictures (or my photograph) don’t show very clearly is that the front has a little gathered section at the side seams at bust level. You can (just about) see in the line drawings what I mean

Vogue 8536 line drawings

I added some extra ease by doing an FBA that created a ‘dart’ but instead of sewing the dart I just incorporated it into the gathers at the side seam. The effect is subtle but it makes for a much better fit around the bust, especially if, like me, you are ‘curvy’. Another design feature of this pattern is the deep hem with side slits –

Deep hem and side vent

I think that this makes it look a little dressier than the average casual t-shirt and it means that the hem sits very nicely when worn with skirts. The fabric I used was a rayon lycra mix, purchased from Vogue Fabrics - I was attracted by the fun flower print. I can see me making this pattern several times more and I think it would be very lovely and luxurious made in a silk jersey.

I feel that I have made a very slow start on my fall sewing but in the last couple of weeks I have worked out lots of plans for clothes that I am eager to make. I do hope that your sewing for this season is going well?

Sunday 16 October 2011

My Chanel inspired dress - Butterick 5602!

Last week I was in a frenzy of indecision - so many fabric and pattern possibilities were whirring around my brain that I just didn’t know what to make next. At times like this I think that you can’t go too far wrong if you turn to the classics. And you can’t get much more classic than a Coco Chanel inspired little black dress trimmed with white.
 
The LBD inspired by Coco Chanel

"I said that black has it all. White too. Their beauty is absolute. It is the perfect harmony.” Coco Chanel.

The pattern I used was Butterick 5602

Butterick 5602

I made the version drawn in pink but without the bow. I was aiming for a comfortable shift dress, as Coco also said: “Luxury must be comfortable, otherwise it is not luxury”.

However, I didn’t want it to be totally shapeless. This dress has both horizontal and vertical darts at the front and vertical darts at the back – so there is plenty of scope for getting a good fit at the bust and some curving in at the waistline.

The fabric I used is 100% wool crepe purchased from Linton Tweeds who are based in Carlisle but also have an online store. If you are going to make a ‘Chanel’ dress there is nowhere better to turn to than Linton.

Linton Tweeds showroom in Carlisle

They have been supplying fabric to Chanel since Coco herself was in residence at her Paris Salon in the Rue Cambon. To this day Linton still count the house of Chanel as one of their most prestigious clients – along with Oscar de la Renta, Balenciaga, Michael Kors, Lanvin and Caroline Herrera. Oh, and little old me, Eugenia! They supply a wonderful range of tweeds and fancy fabrics as well as a top quality wool crepe in a variety of colours.

So, with a sewing machine, a few hours work and some wool crepe anyone can have a made to measure ‘Chanel’ dress!

Friday 7 October 2011

Cape Fear or Cape of Good Hope?

Throughout the last winter I harboured a hankering for a cape but I never got around to making one. This year I decided to jump right in and make one before those nagging suspicions that a cape would look silly and be totally impractical stopped me.

Maybe a bit silly and only a little impractical!

Right now there seem to be quite a few patterns for capes in the current collections but, as it happens, I used a vintage pattern


What especially attracted me to this pattern is that it's reversible - two capes for the effort of one!

If this wind blows me away, will this cape help me fly?

Although a cape doesn't really have to fit very closely anywhere I did go to the trouble of making a muslin to get some idea of how this was going to look on me. I'm glad that I did because it made me realise that a long version was going to swamp me and that to look more modern it needed to be quite a bit shorter than the shortest version of this pattern. I also discovered that if the arm slits were longer it would allow a bit more arm movement. I should, perhaps, also mention that at this point my husband looked pretty dubious about the whole cape prospect, muttering that he didn't want to put me off something that I was clearly hell bent on making but he didn't have high hopes for the finished garment.

I used 100% wool in a dark grey for one side and pale grey for the other. Because I felt it needed a little glamour and cosiness I decided to experiment and make the collar in a white faux fur.

Nothing like a bit of faux fur for glamour!

Also, I used a metallic silver thread for the topstitching around the front, the hem and the pocket slits. The whole thing was super-easy to make. It only needed two buttonholes at the top, one on either side. These are fastened together by sewing two buttons together with a thread link so it can be buttoned up whichever way round I am wearing it -


I went through the construction process with mixed feelings - Fear and Hope. So, what's my final verdict on the cape? Well, I do like the way it turned out. I can also tell you that when my husband saw it finished he looked quite startled and told me that it looked a million times better than he had feared: in fact he really likes it. Since making it I have worn it twice and it is perfect for just throwing on when going out for dinner or to visit friends. I wouldn't, however, choose to wear it for a day of shopping because you can't carry a bag over your shoulder: you have to clasp it in your hand, which is a little restricting. I doubt if I will make another cape but I'm really happy that I have this one and have, finally, got the cape craving out of my system!

What about you - is a cape a garment that you would ever consider wearing, do you like the look, hate it, or does the sheer impracticality of a cape rule it out for you? I’d love to know ……

Friday 30 September 2011

Online fabric shopping - yea or nay?

I live in London, a large city that has a wide variety of fabric stores that I love to shop in.


So, you would think that I would have no need to venture into the world-wide-web to feed my fabric buying habit. But I do buy fabric on the internet. In fact, I buy quite a lot of fabric on the internet.

Shopping in a real, bricks and mortar, store is, without a doubt, a very enjoyable experience. For me the main advantage of buying fabric this way is the obvious one - you can actually feel the fabric so you can judge how it is going to drape and behave as a garment and you can be certain of the exact colour and texture. And there is, of course, the pleasure of that instant gratification - you walk away with a bag in your hand and your head full of sewing plans for your lovely new fabric.

"I'll just take a quick look in here!"

However, I think that there can be a downside to shopping in a store. The array of fabrics piled high can be quite overwhelming so that it can be difficult to consider options and decide on the best purchase. When time is limited it is easy, on impulse, to buy something pretty and colourful although you would really be far better off picking out a less flamboyant, but more useful, solid wool. Another problem that I sometimes encounter is the pushy sales assistant. In some stores the assistants will happily leave you alone to browse but in others I have found that from the minute I step through the door I am accompanied by a person who is keen to show me anything and everything they can. As soon as I touch (or even let my eyes linger on) a roll of fabric, the fabric is pulled out, unrolled and its virtues exclaimed upon. In this situation I tend to feel that I have two choices - buy a lot of fabric that I'm not absolutely sure about or flee empty handed.

When shopping on the internet, although I am denied the opportunity of touching the fabric, I can spend as many hours as I like, at any time of day or night, checking out the stock. Some internet sites, such as Gorgeous Fabrics, and Vogue Fabrics (which are two of my favourite sites) have a 'wish list' facility which allows me to gather together fabrics I like on one page. I can then see how they look together. I can get out patterns, think through what fabric will work with what style and I can check exactly how much yardage I will need. I don't have to press the 'buy' button until I'm good and ready.

Another plus side of internet shopping is that the reputable online stores give you accurate information about the fibre content of the fabric and the recommended care instructions. In real life stores, especially the discount ones, you usually don't get any of this information - the fabric is rarely labelled and the sales assistants can sometimes be, quite frankly, woefully uninformed or wilfully vague.

Of course, when ordering on the internet you have shipping costs to pay (and possibly customs duties if ordering from abroad) so these have to be factored in when considering the cost of the fabric. And then you have to wait for your fabric to arrive at your door.

"What was it that I ordered ... I seem to have forgotten?"

However, I don't mind the wait so much because when my parcel does arrive, it's very exciting - it's like getting a present from somebody who has perfect taste and knows exactly what you want!

So, I enjoy shopping in both real and virtual stores. I guess what I am saying is that I just love to buy fabric! But what about you? Do you like to order on the internet or do you have to feel the fabric before you can commit? I'd love to know ....

Saturday 24 September 2011

Simplicity 2497 Cynthia Rowley dress!

My latest make is what I like to call an easy-to-wear dress in an all-year round print fabric (which, by the way, is a silk twill designed by Phillip Lim).

Simplicity 2497 by Cynthia Rowley

In the coming months I am planning on wearing it with boots and a cardi but I also have visions of throwing it on with some shiny gold sandals when summer finally returns.

How this dress came about is interesting. I didn't feel like fitting a new pattern so thought I would rummage through my very large box of patterns that I have made previously to see if something caught my eye to make again. As I went through them I was saying "No, not that one, not that one, never that one ....... oh, hang on a minute, what was that?" I backtracked to take another look at this pattern


I made the dress with the ruffle on it almost two years ago (blogged about here). I do love the dress but I didn't feel the need for another one, especially as it is rather low cut (even after I raised the neckline!). There is a limit to the number of places I go to that require a ruffley low cut dress. However, until last week, I had completely overlooked the fact that there is another view for this dress (shown in the bottom row of the line drawings on the pattern envelope). Instead of the ruffle it has a faced neckband, which means the neckline is at a higher, more respectable level. I decided that this version, but without the puffy sleeves, would be exactly right for my nice designer print.

When it was almost done I got the feeling that the dress needed just a little something extra to give it a bit of punch and a more 'finished' look.

"It needs a little something!"

I was thinking of doing some topstitching in heavy black thread around the neckband when I remembered that I had some sew-on jewels in my stash. I purchased these a long time ago for nothing in particular but I felt that one day they would be 'the perfect thing' for something.

Just the thing - a little bling around the neckline!

So, my tip of the week is this. Don't forget to take a close look at your pattern stash - sometimes you might be surprised to see that a pattern you had dismissed has got another view sitting, unassumingly, in the corner just waiting for you to notice it and turn it into a dress you really like!

Friday 16 September 2011

Vintage Simplicity 4175 finished!

In my last post I mentioned that I have been working on a dress made from a vintage Simplicity pattern so, without further ado, here it is, finished!

Vintage Simplicity 4175

I used a Liberty of London silk fabric. The busy flower print makes it a little difficult to see all the details in a photograph so here’s how Simplicity describes it:

This “Simple to Make” dress is styled with soft pleats at the shoulder and at waistline of skirt front. A forward shoulder seam is featured and both views are sleeveless.

The pattern envelope is a bit worn and torn but the pattern pieces were in perfect condition.

No, my bust isn't 32" - this needed some grading up!
 
When I first started on this project I thought that I would make the view on the left with the tie at the neckline. However, as the work progressed, it became clear to me that a bow on top of everything else going on with this dress was going to be just a bit more than my short frame could carry. But, of course, I did put the buttons down the front.

Yes, that's 12 buttons!

These are also vintage (I blogged about their purchase here) and they are purely decorative. The pattern instructions tell you to use a lapped zipper or snap fasteners for the side opening but I used an invisible zipper. As is often the case with vintage patterns the armholes are supposed to be faced. However, as I was suspicious that the facings would flip out and annoy me, I decided to bind the armholes with bias strips from the dress fabric. Another change I made was to add a lining to the skirt.

Inside the dress - the skirt is lined

The unlined silk worked beautifully for the bodice because it needs a soft fabric for the pleats to drape nicely but I wanted the skirt part to be a little more robust. I think it worked well. Also, as you may have noticed, I chopped a good few inches off the length.

One design feature of the pattern that I did stick to is the self-made matching belt. This was my first attempt at belt making and I must credit Casey from Elegant Musings for her very excellent tutorial which helped me enormously.

Fabric belt made with purchased buckle

So, although I think my 1952 dress is in keeping with the intended style I have to confess that it is not perfectly authentic because I have given it a few modern updates in the construction – I hope you don’t find that too shocking? I enjoyed working with this pattern and love many of the styles from past eras. I do plan to make some more vintage patterns but I could never see myself going exclusively vintage - I am way too tempted by the latest fashions and relative ease of use of the modern, multi-sized patterns. How about you? Is vintage your thing or is it the 21st century all the way for you?

Thursday 8 September 2011

Still hanging on to summer ....

The weather has turned blustery, the days are getting shorter. The blogosphere is buzzing with plans for fall sewing. And what am I doing? I am looking at my large pile of summer fabrics.

Did I really buy all this fabric?

Where is that sassy sundress I was going to make? What happened to the cute shorts? Why haven't I made those luxurious loose linen pants I decided on? How come I never made ..... oh, never mind. So many patterns, so much fabric, too little time!

As I am not quite ready to plunge straight into winter wools I am working on what I am calling a transitional piece. Here's a sneak peak

Eugenia goes vintage!

I am feeling pretty excited about this one. The pattern is dated 1952, the buttons are also vintage and the fabric is a Liberty of London pure silk (purchased in the sale but still at great expense!)

Although it could very obviously be worn as a 'summer frock' (and I am still hoping for an Indian summer), I think that the subdued colours will allow me to wear it as a fall outfit paired with my black boots and a little cardi.

What about you? Did you actually get to make all the wonderful garments you planned for the summer? Are you sitting there feeling, dare I say it, rather smug as you move on to the new season. Or, like me, are you sadly staring at a huge pile of unsewn fabrics and wistfully thinking of all the clothes you should now have hanging in your wardrobe? I’d love to know …..

Friday 2 September 2011

Vogue 8603 and how a zebra wears her stripes!

My latest make is one of those great wardrobe staples - a pencil skirt made in an animal print. Classic styling in a fun fabric.

Zebra print pencil skirt

The pattern is Vogue 8603 - for a variety of lined, straight skirts with princess seams and a back zipper.

Vogue 8603

The version I made has a gathered panel at the bottom of the centre back (which isn't shown in the picture above).

Inside the skirt - the back

I have made this pattern before in plain black (blogged about here) and really like the fit, so when I purchased this zebra print cotton fabric I knew straight away what I wanted to do with it.


Zebra stripes run from selvedge to selvedge

It was only when I came to cut the fabric that it dawned on me that if I cut the skirt on the lengthwise grain (in the usual way) the zebra stripes would run horizontally around my body. Now I'm not a great stickler for those rules that dictate what different body types should wear but I have to admit that, as I am short, I do tend to find that horizontal stripes, especially on a skirt, have the effect of making me look shorter and wider than I want to look.

Out of interest I thought that I would check out which way a zebra wears her stripes. It turns out that she wears them vertically at the front and horizontally at the back.

Tell me honestly, does my butt look big in this?

So she looks taller at the front, but wider at the back. However, I doubt very much whether zebras waste much time worrying about body image, they have more pressing things, like not getting eaten by a lion, to worry about. 

So, anyway, I decided to cut my skirt on the crosswise grain and wear my stripes vertically - I'm trying for tall and thin! What about you - which way do you like to wear your stripes. Do you think it makes any difference? Do you care?

Sunday 28 August 2011

How I get an invisible zipper looking neat at the top!

I know I have mentioned this before, but I hate hooks and eyes. They are pesky little things to be avoided at (almost) all costs. Usually I just leave them off and nothing terrible happens - my garments don't inconveniently unzip themselves! However, doing this does mean that you can sometimes get a little (or large!) ‘V’ shape at the top of the zipper where the opening doesn't quite close. In a tireless quest for perfection I have been working on ways to avoid this.

You might remember that the last dress I made (featured in my last post) has a low back neckline so the zipper closing is very visible. But, if I say so myself, I think I was quite successful in getting it to look acceptable without having to resort to a hook and eye.

Close-up of back zipper

As it is a rainy bank holiday Sunday and I am nursing a miserable cold I thought I would occupy myself by sharing my secret technique with you. Firstly, however, a warning! I have never seen it done this way in a book so it is probably VERY WRONG. If you want to do things properly, maybe you shouldn't try this.

As I didn't take photos when I made my dress, I have made, from scrap fabrics, a mock-up of one side of a back bodice to illustrate what I am talking about.

At the back of the zipper, with the zipper closed, put a chalk mark on the zipper tape where the top of the slider finishes.


Open the zipper and pin it to the right side of the back bodice, in the usual way, so that the zipper teeth are along the centre back seam line and the chalk mark you have made is just below the seam line of the neckline. How much below depends on the thickness of the fabric - if it is thin 1/8" will be ok, thicker fabric needs about 1/4" - you are allowing for the turn of the fabric.

If you are making a dress with an edge to edge lining that has already been attached it will be placed below the already sewn neckline seam that joins the bodice and the lining. If you are going to be attaching a facing after inserting the zipper it will look like this photo, (I have chalk marked the seam-line for the purposes of clarity - I wouldn't normally do this.)

Start sewing from chalk mark on zipper tape
Sew the zipper in the usual way, with an invisible zipper foot, But DON'T start sewing from the top of the zipper tape (which is how books usually demonstrate it is done). Instead you should start sewing from the chalk mark down to the end (I use the lockstitch on my machine at the start point). Do the same on both sides.

The top of the zipper tape, above the slider, will be loose. Then, if you are attaching a facing, you should pull the tape out of the way and sew the facing to the bodice WITHOUT sandwiching the zipper i.e. like this (pretend the yellow fabric is the facing)

DO sew zipper like this
and NOT like this.

DON'T sew zipper like this

Leaving the top of the zipper tape free means that when you close the zipper and sew the lining or facing to the zipper you can pull the bits of the zipper tape that are above the slider well inside the garment and out of the way. I find that this way it is easier to get it looking neat, it helps avoid nasty lumps and you can get much less of a ‘V’ at the top of the opening.

After much experimentation this is my preferred (if unorthodox!) way of dealing with invisible zippers. It works for me on skirts as well as dresses. I hope that you find it helpful to see how I do it.

Do you have a tried and tested way of getting invisible zippers to look how you want or do you struggle with them? I'd love to know .......

Friday 19 August 2011

Vogue 8555 made from Oscar de la Renta fabric!

I wanted to make a new dress to go to the Proms - something pretty and flowery, but a little bit sophisticated, would be just right for a classical concert on a summer evening. Some beautiful silk fabric, designed by Oscar de la Renta, jumped from my stash saying "make me into Vogue 8555".  So I did.

Vogue + Oscar!

I like the low back neckline!

This is my second version of this pattern, I love the pleated and gathered bodice.

Vogue 8555
I have worn the first one (blogged about here) many times, so I was keen to make another. It also meant that I wouldn't be taking too many risks with my expensive piece of designer fabric!

Last time I followed the pattern instructions exactly but I wasn't entirely happy with the zipper/lining construction, I thought it looked a little messy inside the dress. The pattern tells you to sew the zipper to both the fabric and the lining at the same time so that the zipper is outside of the lining. This time I did it differently. When I attached the lining to the dress I left a few inches of the lining for the bodice, the midriff and the skirt at the centre back unattached. I inserted the invisible zipper to the outer fabric only, then hand stitched the lining so that it enclosed the zipper. It is a bit fiddly but I think that it looks much neater if you do it this way.

Inside the dress

Anyway, here is the dress in action at the Royal Albert Hall, in Kensington, where the Proms concerts are held

Arriving at the Royal Albert Hall

In front of Kensington Gardens and the Albert Memorial

I'm hoping that Oscar would approve of what I've done with his fabric!

Monday 15 August 2011

When wearing ill-fitting clothes really is a crime!

I want to say thank you to all of the very kind commenters who, after my last post, expressed concern for my safety during the riots that we experienced in London and other parts of England last week.

I am happy to tell you that the riots didn't reach my street although last Tuesday afternoon it was very strange to see our local high street heavily guarded by police. A large proportion of the stores were closed throughout the afternoon and many were protected by iron shutters or boarded up. Thankfully, things returned to normal the next day.

So far 1,401 people have been arrested and 808 charged in connection with the riots. Amongst them was a young man, aged 17, apprehended wearing luxury clothing stolen from a store called Zee and Co, in east London. How was his crime detected? Police were suspicious when they noticed that his pricey designer clothes didn't fit him. "They were very expensive and if someone spends that sort of money they would at least get clothes that fit" noted a prosecuting lawyer. (Reported by Tom Coghlan in today's The Times).

So, this young man is happy to walk around looking a complete idiot in ill-fitting clothes just as long as they have the right designer label. Priceless!

My advice to him would be, learn to sew. It will keep you out of trouble and you will then be able to wear clothes that fit, make you look good and keep you out of jail!

Anyway, as every post needs a picture, here is a photograph of my very own brush with law and order. Actually I mean Law & Order

Eugenia at the desk of ADA John J. McCoy!
This was taken a few years ago when I was lucky enough to visit the filming of my very favourite crime show, in New York City. Pretty cool eh?

Tuesday 9 August 2011

Burda Style skirt + top = tropical madness!

For approximately 360 days of the year my latest sewn outfit looks crazily optimistic when worn in my home city of London. But last week we just happened on a few 'heatwave' days that made me glad I hadn't totally lost faith in the sun ever shining on us again.

I'll have a Tequila Sunrise please!

Both the skirt and top are made from Burda Style magazine patterns that are easy to make. The skirt is pattern no. 114 from July 2008.

Burda Style #114, July 2008
I have made the pattern before (blogged about here) but this time I left out the eyelets and tie on the front yoke because I wanted a slightly more streamlined, less sporty look (and, yes, I was being lazy!). The fabric I used is 100% cotton.

The top is taken from an even older issue of Burda, it's pattern no. 119 from the July 2007 issue.  

Burda Style #119, July 2007
 
This is also an old favourite revisited because I first made a version of the top over two years ago. I kept meaning to make another one and I'm happy that I finally have. I like the style a lot - the gathers that go into the button band add some interest and nice shaping. The fabric I used is a silk that I have had in my stash for ages. 

Top out, more casual!

I hope that my choice of fabrics hasn't put you off these two really nice patterns. A dazzling sunshine yellow skirt paired with a bright and splashy flower print top is not everyone's cup of tea. I know that it's not really 'city chic' but sometimes I just can't help myself. I find I am irresistibly drawn to colours and prints that make me look like I have just stepped off a cruise ship. Is your wardrobe firmly rooted in your home climate or do you, like me, sometimes sew as if you are on a semi-permanent tropical vacation? Or, perhaps you actually do live in a hot-spot, in which case, do you sew as if you are hoping for snow?

Related Posts Plugin for WordPress, Blogger...