Tuesday, 14 September 2010

The coat chronicles continued .....

A big thank you to everyone who commented on my dithering over the Lady Grey coat pattern in my last post. Your extremely astute opinions helped me clarify what I really felt about my dilemma. The overwhelming consensus was, at the very least, proceed with caution! Some said don’t do it at all. Whilst I am not saying that I’m never going to make it, I have decided that I am definitely not going to make it now. I shall, however, be following the Sew-Along with keen interest and envious admiration.

I do love the pattern but, as I am small, top heavy, short-waisted and not particularly thin, I really don’t think this is the style for me. I have to confess, however, that I don’t always follow the ‘rules’ when it comes to determining what I might look good in and what I want to make. For instance, it is often advised that small ladies should avoid full length dresses and large prints, yet one of my favourite dresses is my maxi dress, made from Simplicity 3503 (blogged about here and here). It’s long and the print is huge. I totally agree with the advice that The Slapdash Sewist offered me: “if you're comfortable in what you're wearing, you'll look good. So just *decide* it's going to flatter you and it will”. I think that is very true of my maxi dress – it doesn’t really matter whether it actually flatters me or not because every time I put it on it makes me feel cool and carefree and makes me smile!

So I don’t mind taking risks when deciding what to sew but I’m not in the mood to do it with a coat. A coat is a lot of work and takes up a lot of space in the wardrobe so I want a coat that I am going to be able to wear often and always feel good in. Lindsay T commented that she felt I would “look better in a more streamlined and classic style”. As soon as I read that I thought YES, that’s what I really want – streamlined and classic is what my wardrobe needs. So I have been looking through pattern catalogues and my collection of Burda magazines to find something that fits the bill and have found some promising contenders.

Still obsessed with the idea of my coat being camel, I set off for the Goldhawk Road to do some research on cost and availability of camel coloured coating. I went into most of the stores before finding exactly what I wanted. My credit card came out and what was supposed to be a research mission turned into a buying trip. Here it is, pictured with the reference books I have been studying in preparation for the task!

It’s 100% wool, beautifully soft and is a delicious melted toffee shade. It cost £12 per metre.

So, last week I had a coat pattern but no fabric. Now I have the fabric but no coat pattern!

I have to tell you that I am quite exhausted by this coat before I have even begun so, for now, I am going to turn my energy to making a few less demanding items of clothing to get my autumn wardrobe going. After all, I am going to be needing something to wear underneath this coat, when it finally gets made!

In the meantime, what about you - do you know what ‘the rules’ for your particular body shape are? Do you care?

Thursday, 9 September 2010

Is the Lady Grey for me?

For the last week or so I have been eagerly waiting for my Lady Grey coat pattern to arrive from Colette Patterns so that I can count myself in on Gertie’s coat sew-along. Finally, hurrah, it arrived today.

But, here’s the thing. Despite the delightful anticipation, despite my great interest in other people’s preparations for the task, I have been harbouring a few doubts. Is this Lady the one for me?

I would like to be part of a sew-in and I think that this one is going to be especially fun. The coat oozes style – that big collar, the flared skirt and wide sleeves are definitely eye-catching and I love them. However, those are the very things that are making me hesitate. I am short and easily swamped so, if I’m honest, I'm not sure if this would have been my first choice for a coat pattern to flatter my figure. I have looked at the pattern pieces and can see how I could reduce the lapels, the collar and the flare but I don't think I want to do that - wouldn’t I then actually be making a different coat? It is those style elements that make this coat distinctive. I like the look. Hmmm it’s a conundrum.

In the meantime I have been pondering on fabric. My first thought was to go for classic black – you can’t go wrong with a black coat. But then I was in the hairdressers (getting my highlights done – lot of time sitting about!) where I thoroughly perused the September issue of Vogue and I discovered that this season’s colour for coats is CAMEL. Those fashion-savvy people at Vogue say: “Invest in a classic camel coat and we guarantee you’ll wear it forever”. With that in mind I’m going to check out the discount fabric stores in the Goldhawk Road (London) to see exactly how much I’m going to have to invest to get 4 ¼ yards (oooh she’s a fabric hungry lady!) of camel wool for this coat.

I have to say that the thought of a coat in delicious caramel shade of camel – all expensive and elegant looking – is getting me quite inspired.

Also I must mention that along with the Lady Grey I ordered the Rooibos dress pattern and, I have to tell you that I’m definitely excited by it – I think this one (made a little longer than the model is wearing) is ‘me’. It’s gone straight into my autumn ‘to do’ pile.


In the meantime, what do you think of the prospect of me in a camel Lady Grey – at 5ft 2” am I too small to carry it off? Help, I'm in a frenzy of indecision ......

Friday, 3 September 2010

The thrill of a frill - Simplicity top finished!

Bearing in mind my weakness for frills and ruffles and my great liking for patterns that offer separate pieces for B, C or D cup sizes, I really don’t know why I didn’t get around to making up Simplicity 2599 earlier. This pattern has been sitting around in my stash since it was issued last year – as soon as I saw it I leapt on it. And I’ve had the coral coloured silk I planned to use for it since the spring of this year. All summer I kept meaning to make it but, somehow, it never reached the top of the pile - until now. But, as they say, better late than never and here it is

In case you’re wondering, I’m wearing it with the skirt I made from the April issue of Burda Magazine (blogged about in this post). So I’ve got ruffles at my neck, a flounce round my hem and a bow at the back! Is that too much?

The top is pretty easy to make but the ruffles do take a bit of fussing with to get just right, especially with a slippery silky fabric. As I mentioned in my last post, I tried out a new technique to make this easier and did the gathering of the ruffles with my new best friend, my serger. This way the ruffles get the edges finished at the same time as the gathering threads are put in – you then just pull up the needle threads to adjust the ruffles to the exact length you want them and sew them to the front. Here’s a close up of the ruffles

And here’s one with a ruffle lifted up so you can see how it is attached to the front.

At the back of the neck there is a button and loop closure. If you want to make this top quicker you could actually do without this (I can take the top on and off without undoing the button). However, I like the elegant look of the closure and I found some cute looking rose shaped buttons in my button box (I have no idea where they came from – do things mysteriously appear in your home?!), so I used one of them


I think that this pattern is definitely worthy of another outing at some time in the near future but, in the meantime, I’m starting to think that summer sewing has to stop now …… I need to do some serious planning for my autumn (fall)/winter wardrobe.

Thursday, 26 August 2010

I've made friends with my serger!

I have something humiliating to admit! Although I have owned my serger for some years, we’ve never really got on. It’s a Janome 134D and I can’t fault it. No, the blame must lie at my door. Instead of rolling up my sleeves and spending some quality time practising how to use it properly I just used it to finish seams. I never gave it a chance to show me what it could really do.

But all that’s changed now. I signed on for the Pattern Review online class, Break your Serger Out of the Box, taught by Jennifer Stern, and now that I’ve completed (almost) all of the course worksheets my little Janome and I are the best of friends.

During the course I learnt how to thread it fearlessly, adjust all the tension knobs to cope with different fabrics, alter the differential feed, change the needle plate and disengage the knife. Pretty embarrassing that I couldn’t do all that before, isn’t it?

Once we had the basics sorted out, Jennifer taught us how to do some brilliant and useful things with a serger. Here’s a picture of just three of the many samples I churned out.


The top one is a really neat rolled hem on a fine cotton lawn fabric – I have used black thread so it shows up but, of course, I could have used a matching thread or even a nice shiny decorative thread.

The middle sample shows how you can use a serger to make gathers – this is a great way of gathering fabric and neatening the edges at the same time.

The bottom one shows a lettuce hem on a knit fabric – here I used a combination of black and gold threads.

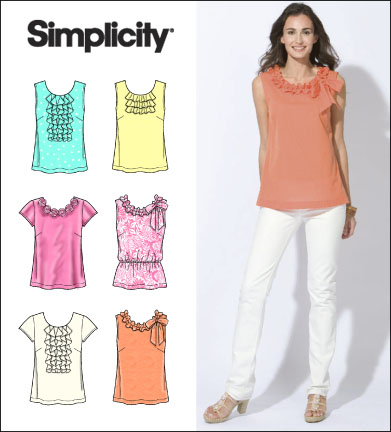
I am already benefiting from my new found knowledge because I am currently working on this pattern, Simplicity 2599 -

I’m making the one with the three ruffles below the neckline (the top right drawing) and the sample of the gathering in my photo above is a mini practice run for the ruffles – I’ve used the coral coloured silk that I’m making the top in.

So, how about you - is your serger friend or foe? Have you been using your serger for a whole range of stitches or are you a little wary of it? Do its knobs and knives thrill you or terrify you?

Thursday, 19 August 2010

Simplicity 'Amazing Fit' dress - finished!

Fortunately I recovered from my mishap with this dress (confessed to in my last post) pretty quickly and now, of course, I’m telling myself that I really do love the tab and buttons. Isn’t it funny how we Sewists can so quickly adapt and think positively? A ‘foolish mistake’ can become a ‘design decision’ and so we find ourselves with a dress we love.

Anyway, put some sunglasses on, because here it is


That orange is pretty dazzling isn’t it? In the summertime I’m a sucker for bright colours – orange, yellow, throw in a bit of hot pink and I’m happy!

The fabric is a cotton pique that I purchased from Elliott Berman in New York and I think it’s just right for this style – it’s soft but not too thin, it has some body but isn’t too stiff. Normally I’m a bit of a lining fiend but, as the pattern didn’t call for a lining, and I felt this fabric would be good on its own, I have made it unlined.

The pattern is Simplicity 2648 and the instructions are interesting – I think they’re either genius or annoying, depending on what you want. It’s an ‘Amazing Fit’ pattern so they give you loads of helpful instructions on how to get the fit just right but in order to do this they ask you to baste the whole dress together, make your adjustments, then TAKE IT APART and sew it together again DIFFERENTLY. What I mean by this is that you baste the front bodice and front skirt together then you baste the back bodice and back skirt together and then baste front to back (so it’s easy to fit down the sides). Then you take it apart and sew it together the more usual way – i.e. sew the bodice, then sew the skirt, then join the two together. It’s great if you need to be guided through the fitting process.

Personally, I didn’t do it that way. I bought the pattern because it has separate pattern pieces for A, B, C or D, cups (always a big selling point for me!) and, of course I really liked the style. I like the close-fitting princess seam bodice and I like that the skirt front has two vertical seams with no darts. I did the fitting by making a muslin. I am such a weird shape that I usually have to make all sorts of adjustments that wouldn’t be so easy to make later, once the nice fabric was cut. However, as long as you are prepared to sort out which part of the instructions you want to follow and which you want to ignore, then I really recommend this pattern.

Before I go, here is a close-up of that button tab that I’ve grown to love so much

But next time I make this pattern I’m going for the version with the belt because I think I’m going to love that too. Hey, I’m easy to please!

Friday, 13 August 2010

Oh, I could kick myself!

Note to Self: When making a garment, please READ THE INSTRUCTIONS. You may think you know how to do it but a little glance at the instructions as you go along really will save upsets. Yes, like that nasty moment we had yesterday!

Readers, I’m making this dress, from Simplicity 2648.

I decided to make the sleeveless version with the round neck (like the drawing on the bottom left) but with the little fake belt with the buckle at the front (like the drawing in the middle). Having altered my pattern for an ‘Amazing Fit’ and cut out my fabric I was pretty excited and all set to go. I sewed the bodice front to the side fronts, made the darts in the bodice back, sewed the back to the front at the shoulders and side seams, checked the fit – great, and then serged all seams. Then I noticed some pieces sitting on the table, yep, the belt pieces!

Now any reasonably experienced sewist will probably know that sewing the belt pieces to the bodice front is the FIRST thing I should have done, before sewing the front to the side fronts. Actually, I did know this myself because I had, at some point in the last week or two, read the instructions and, thank you Simplicity, they couldn’t have been clearer. It’s just that I never bothered to look at them again when it came to actually sewing the thing and I FORGOT the belt pieces.

I hate to unpick a serged seam but I would have done it if it hadn’t been for the fact that my cotton pique fabric, lovely as it is, ravels a lot and, because it was a curved princess seam, I had serged it right next to the seam stitching. I feared that an attempt to take it apart would end in disaster.

So, alas, no little belt with a nice buckle. I really wanted that little belt. Instead it’s going to have to be the tab with the two buttons (like in the main photo on the pattern). Fortunately sewing and attaching that tab is the last thing you have to do. So, now I’m off to buy some buttons!

In the meantime, have you ever forgotten a crucial sewing step – please tell me that I’m not the only one?!

Thursday, 5 August 2010

Simplicity dress - version two completed!

In my last post I promised a second version of Simplicity 2403 and here it is -

This dress started out with a piece of fabric at Metro Textiles (in New York), seized upon during my recent shopping trip there with Carolyn, Elizabeth and Opal (thanks to you all for your valuable input on my choice). There was only just over a yard left but I thought, that’s fine, it will make a very nice skirt and, at $5.00 for such a good quality piece of stretch cotton, it’s a bargain.

Later, (in New York Elegant Fabrics) I happened to chance upon a piece of cotton lawn that perfectly matched the aqua/mint shade in the print. So I thought, great, that will make a nice little blouse to go with the skirt. Next I found myself in M & J Trimmings and chanced upon some grosgrain ribbon that was exactly the same colour. And that’s when it came to me. Forget this separate skirt and blouse idea - why not use the Simplicity pattern I had just used for my last dress to combine both fabrics into a shirtwaist dress?

I have to say that when I got back to London my heart did sink a little at the prospect of making another version of this dress because (as I moaned in my last post) there is a lot of work with this pattern. However, my enthusiasm for the project overcame my reluctance. This time I decided that I wouldn’t have the tie belt but instead I sewed grosgrain ribbon onto the middle of the waistband before attaching it to the dress. I also decided to add the front ruffles that are one of the ‘designer additions’ included in the pattern.

Ah, yes, the ruffles. They nearly defeated me. The pattern has you cut four ruffle pieces and you’re supposed to narrow hem each of them, then place them one on top of each other in pairs – two for the left side and two for the right side. Now normally I’m not too bad at narrow hemming but the fabric was very fine and the pieces were small and the curves at the bottom were very curvy! Readers, it was horrible. I tried several times but in the end I just had four sad chewed up little rags – definitely not fit to be sewn down my front! Now, of course, I could have just binned the ruffles and gone without but I WANTED RUFFLES!!

Then it came to me. I cut four more ruffles but this time I sewed them together in pairs with the right sides together then turned them right sides out, pressed them and, voila, beautiful ruffles. So what I have is one double layered ruffle either side, rather than two single layer ruffles either side. Here’s a close up of the bodice –


So, there it is. Conceived in New York, fashioned (with a lot of faffing) in London - another dress came into the world and I like it quite a lot.
Related Posts Plugin for WordPress, Blogger...