Showing posts with label simplicity. Show all posts

Saturday, 24 September 2011

Simplicity 2497 Cynthia Rowley dress!

My latest make is what I like to call an easy-to-wear dress in an all-year round print fabric (which, by the way, is a silk twill designed by Phillip Lim).

Simplicity 2497 by Cynthia Rowley

In the coming months I am planning on wearing it with boots and a cardi but I also have visions of throwing it on with some shiny gold sandals when summer finally returns.

How this dress came about is interesting. I didn't feel like fitting a new pattern so thought I would rummage through my very large box of patterns that I have made previously to see if something caught my eye to make again. As I went through them I was saying "No, not that one, not that one, never that one ....... oh, hang on a minute, what was that?" I backtracked to take another look at this pattern


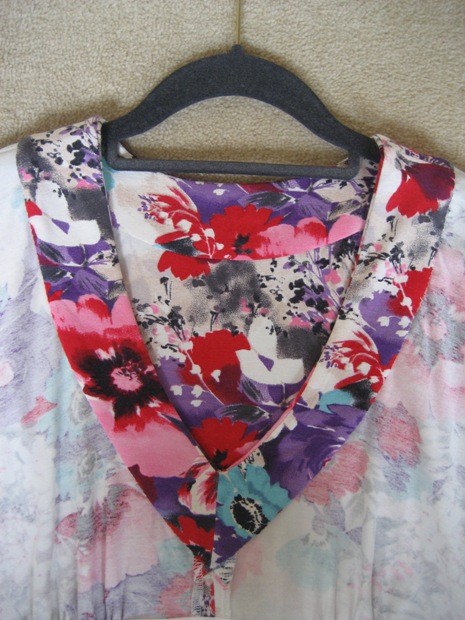
I made the dress with the ruffle on it almost two years ago (blogged about here). I do love the dress but I didn't feel the need for another one, especially as it is rather low cut (even after I raised the neckline!). There is a limit to the number of places I go to that require a ruffley low cut dress. However, until last week, I had completely overlooked the fact that there is another view for this dress (shown in the bottom row of the line drawings on the pattern envelope). Instead of the ruffle it has a faced neckband, which means the neckline is at a higher, more respectable level. I decided that this version, but without the puffy sleeves, would be exactly right for my nice designer print.

When it was almost done I got the feeling that the dress needed just a little something extra to give it a bit of punch and a more 'finished' look.

"It needs a little something!"

I was thinking of doing some topstitching in heavy black thread around the neckband when I remembered that I had some sew-on jewels in my stash. I purchased these a long time ago for nothing in particular but I felt that one day they would be 'the perfect thing' for something.

Just the thing - a little bling around the neckline!

So, my tip of the week is this. Don't forget to take a close look at your pattern stash - sometimes you might be surprised to see that a pattern you had dismissed has got another view sitting, unassumingly, in the corner just waiting for you to notice it and turn it into a dress you really like!

Friday, 16 September 2011

Vintage Simplicity 4175 finished!

In my last post I mentioned that I have been working on a dress made from a vintage Simplicity pattern so, without further ado, here it is, finished!

Vintage Simplicity 4175

I used a Liberty of London silk fabric. The busy flower print makes it a little difficult to see all the details in a photograph so here’s how Simplicity describes it:

This “Simple to Make” dress is styled with soft pleats at the shoulder and at waistline of skirt front. A forward shoulder seam is featured and both views are sleeveless.

The pattern envelope is a bit worn and torn but the pattern pieces were in perfect condition.

No, my bust isn't 32" - this needed some grading up!
 
When I first started on this project I thought that I would make the view on the left with the tie at the neckline. However, as the work progressed, it became clear to me that a bow on top of everything else going on with this dress was going to be just a bit more than my short frame could carry. But, of course, I did put the buttons down the front.

Yes, that's 12 buttons!

These are also vintage (I blogged about their purchase here) and they are purely decorative. The pattern instructions tell you to use a lapped zipper or snap fasteners for the side opening but I used an invisible zipper. As is often the case with vintage patterns the armholes are supposed to be faced. However, as I was suspicious that the facings would flip out and annoy me, I decided to bind the armholes with bias strips from the dress fabric. Another change I made was to add a lining to the skirt.

Inside the dress - the skirt is lined

The unlined silk worked beautifully for the bodice because it needs a soft fabric for the pleats to drape nicely but I wanted the skirt part to be a little more robust. I think it worked well. Also, as you may have noticed, I chopped a good few inches off the length.

One design feature of the pattern that I did stick to is the self-made matching belt. This was my first attempt at belt making and I must credit Casey from Elegant Musings for her very excellent tutorial which helped me enormously.

Fabric belt made with purchased buckle

So, although I think my 1952 dress is in keeping with the intended style I have to confess that it is not perfectly authentic because I have given it a few modern updates in the construction – I hope you don’t find that too shocking? I enjoyed working with this pattern and love many of the styles from past eras. I do plan to make some more vintage patterns but I could never see myself going exclusively vintage - I am way too tempted by the latest fashions and relative ease of use of the modern, multi-sized patterns. How about you? Is vintage your thing or is it the 21st century all the way for you?

Thursday, 8 September 2011

Still hanging on to summer ....

The weather has turned blustery, the days are getting shorter. The blogosphere is buzzing with plans for fall sewing. And what am I doing? I am looking at my large pile of summer fabrics.

Did I really buy all this fabric?

Where is that sassy sundress I was going to make? What happened to the cute shorts? Why haven't I made those luxurious loose linen pants I decided on? How come I never made ..... oh, never mind. So many patterns, so much fabric, too little time!

As I am not quite ready to plunge straight into winter wools I am working on what I am calling a transitional piece. Here's a sneak peak

Eugenia goes vintage!

I am feeling pretty excited about this one. The pattern is dated 1952, the buttons are also vintage and the fabric is a Liberty of London pure silk (purchased in the sale but still at great expense!)

Although it could very obviously be worn as a 'summer frock' (and I am still hoping for an Indian summer), I think that the subdued colours will allow me to wear it as a fall outfit paired with my black boots and a little cardi.

What about you? Did you actually get to make all the wonderful garments you planned for the summer? Are you sitting there feeling, dare I say it, rather smug as you move on to the new season. Or, like me, are you sadly staring at a huge pile of unsewn fabrics and wistfully thinking of all the clothes you should now have hanging in your wardrobe? I’d love to know …..

Monday, 4 July 2011

Yes, it's that dress again and yay or nay for hand stitching?

No apologies, but I have made yet another version of Simplicity 3503. I'm calling this latest version (number five) my 'English Summer Garden Dress' - just right for afternoon tea, the village fete and, of course, garden parties, where I can blend into the rose bushes!


When the fabric, which is a rayon lycra mix, arrived from Gorgeous Fabrics I loved it so much that I didn't want to take any risks with it. At the best of times knit fabrics can behave in quite wilful and unpredictable ways, so having a pattern you've made before really does increase your chances of finishing up with a dress that you love.

The pattern gives you a lot of different options.

Simplicity 3503
The one I made is in the bottom right hand corner (but I didn't use a contrasting fabric for the midriff or neck band).

I do love the sleeves

If I flap my arms hard enough will I take off?
They give coverage but because they are loose they are not too hot on warm days.

Whenever I make this pattern I follow the instructions as written except for one thing. Instead of machine stitching the neck band facing to the neck band at the inner edge I like to hand stitch it. Usually I am all for patterns that give you instructions for machine stitching rather than hand stitching but, in this particular case, I have found that it is easier to control the knit fabric, and keep it looking neat on the inside, if the facing is stitched down by hand. I also like the look of the clean neck band without machine stitching on the outside. But that's just me - if you hate to hand stitch, then following the pattern instructions is the way to go.

Neck band facing inside dress

I don't like to do lots of hand stitching but I do enjoy it sometimes - I find it rather relaxing to be stitching away and listening to the radio and I like the exactness of it. How about you? Do you love it? Do you only do it if you absolutely have to? Or have you worked out all sorts of ingenious ways so that you can stitch absolutely everything by machine?

Is hand stitching haute couture or hateful? I'd love to know what you think .....

Friday, 10 June 2011

Oh, for heaven's sake, not that dress again!

When I returned from my vacation in Miami, in March, I showed you some of the things that I had sewn especially for my trip. However, I have to confess I didn't quite show you everything I had made. It's not that I was holding out on you so much as that I thought to myself, "how many pictures of me standing under a palm tree in Miami do my readers want to see?" Especially as what I didn't show you were dresses made from patterns that I had used previously. But now that's exactly what I want to talk about. TNT (Tried and Tested) patterns.

So, here I am, in Miami, wearing my third version of Vogue 1179

Vogue 1179
I whipped this up in a poly-lycra, called 'Falling Leaves', from Gorgeous Fabrics. My first two versions of this pattern were for the fall/winter season (blogged about here and here).


but I do think that when made up in a brightly coloured fabric, this pattern also works as a casual, comfortable summer dress.

And there's more! Here I am wearing my fourth version of Simplicity 3503, a pattern that I think is pure gold.

Simplicity 3503
Here are my other three versions (originally blogged about here, here and here).


I love how you can get some very different looks from one pattern and, no apologies, I am already planning yet another rendition!

When you are sewing up a storm, with a deadline ahead, I think that there is nothing more valuable that a TNT. But do you think that sewing the same thing again and again is a little boring? Personally I feel happy that I have reached a stage in my sewing experience where I actually have some trusted patterns to fall back on. I know they fit, I know how to make them. However, I do also love to try new patterns, new styles and face new challenges. And, of course, I am always hoping to find another TNT to add to my collection.

How about you? Do you only want to sew something new and different or do you have one or two, or more, TNT patterns that you love and often turn to? I'd really like to know ....

Wednesday, 4 May 2011

Simplicity 2339 Amazing Fit shirt

I have, at last, finished my Simplicity, Amazing Fit Shirt. It wasn’t difficult but, phew, as I grumbled in my last post, there is a lot of work in making a shirt! Anyway, it’s done and here it is

The fabric is a rayon silk mix, purchased from Vogue Fabrics, called Artiste Orchid. I am wearing it with the skirt I made from Vogue 2647 (blogged about here) which is made from a co-ordinating fabric from Vogue Fabrics Early Spring 2011 collection.

Here’s how the shirt looks tucked in

This is my respectable ‘going to the office’ look – only I don’t actually have an office to go to any more but sometimes it’s nice to have this sort of outfit anyway.

Here’s how it looks worn more casually, which is more my everyday kind of look

This is the pattern I used

I made View B (bottom left) i.e. with the collar and with both horizontal and vertical darts but I used the sleeves from View A (bottom right) which have a button and tab cuff thing –

If you want to make this shirt slightly looser fitting, you can omit the vertical darts (as in View A) but I was keen to make an effort to get a pretty close fitting shirt. I can never find a RTW one that fits so I wanted to spend time getting a basic pattern with a good fit that I could adapt in different ways – when I can summon up the energy to tackle another shirt! This pattern has different pieces for A, B, C or D cups and gives a lot of advice on how to make fitting changes, so I would definitely recommend this as a starting point for shirt-making. Also I should mention that the instructions include a neat ‘rolling up’ technique for attaching the yoke and yoke facing to the main body of the shirt without having to do any hand-stitching, which looks much more professional.

Regular readers will know that, alongside this shirt, I have been making a pair of jeans as part of my Pattern Review ‘Blue Print to Blue Jeans’ course (although my jeans are purple, not blue!) They are almost finished and, so far, I’m feeling pretty pleased with them. But more about that soon ……

Thursday, 31 March 2011

A tropical dress from Simplicity 3503

Hi everyone – I’m back from my vacation in Miami. It was wonderful, warm and way too short!

But quickly moving on to sewing matters …… now that I am back I can start showing you the garments that I speedily sewed up for my vacation wardrobe before I departed. First up is my palm print dress –

perfect Miami – see how I blend in with the palm trees!

The pattern is Simplicity 3503


This is the second time that I have made this view, pictured on the bottom right, with the dolman sleeves (my first version was blogged about here). It’s pretty fast to make and easy to fit. I followed the pattern instructions with one exception – instead of machine stitching the inside edge of the neckband facing to the neckband, I slipstitched it by hand. Of course, it doesn’t really matter much either way but I prefer doing this so that I get a clean finish on the outside of the neckband (and this way avoids the possibility of wonky stitching showing in a place where you really don’t need wonky stitching!)

As I mentioned in my last post, the fabric is a polyester-lycra purchased from Gorgeous Fabrics. The reason that some commenters on this post were wary about polyester fabric is that it has low breathability. Personally, I found this particular fabric (it is a very nice quality) quite comfortable but I agree that in humid climates polyester can be problematic. If you are wary about poly in hot weather, this pattern is one to consider because the sleeves give you some coverage but they are loose and flappy, and the skirt isn’t fitted, so air can circulate.

Anyway, enough of my vacation sewing for now but more in my next post ……..

Friday, 21 January 2011

Vogue 2647 + Simplicity 2599 =

An outfit! Yes, I am feeling quite pleased with myself because, at last, I have actually made two co-ordinating garments sewn specifically to work together. In the past I have tended to sew in a random, whatever takes my fancy, kind of way. But, as the New Year arrived, I decided it was really time to get myself organised and make an actual outfit.


The skirt is made from Vogue 2647 (which I think is now out of print). It’s a nice A-line shape with a slit at the centre front and zipper at centre back. Here’s a picture of the pattern envelope.


Because the fabric I picked for the top is quite a busy print I wanted to make a simple shell top and was searching for the right pattern when I realised that this one

Simplicity 2599 would fit the bill. I had made it before (blogged about here) so I had got the fit worked out – this time I just made it without the ruffles.

I bought both fabrics from Vogue Fabrics. They are from their Fall 2010 collection. The fabric for the top is called Reinhard Kernels and is a silk with a hint of lycra. The skirt fabric is a linen/cotton mix, called Reinhard Linen-Weave. As you might already know, Vogue Fabrics make co-ordination easy because in their collections they put together selections of fabrics that work together. I really like how these two fabrics look.

I should also mention that the top and skirt have something in common in that they both have a button and loop closure. At the back of the neck on the top

And at the top of the zipper on the skirt.


I’ve never come across this on a skirt pattern before and I really like it – it gives the zipper opening a neat looking finish without having to use a dreaded hook and eye. You can also, hopefully, see the topstitching which I have used on all the vertical seams and the hem of the skirt – I used a machine embroidery thread in silver, which gives a shiny but quite subtle effect.

You might also have noticed that with this outfit I am continuing my grey/gray theme from my last post. Thanks to everyone who made such nice and encouraging comments about my love of the colour. And it turns out I am not alone – Grey appears to be THE shade of the moment and lots of you (including Victoria and Allison) are going grey in the nicest possible way.

More soon ……..

Sunday, 19 December 2010

Simplicity 3503 - the any time dress!

Looking through my stash last weekend I found a very nice piece of polyester lycra knit fabric that I had been saving to make a summer dress. But it suddenly occurred to me that perhaps the animal print colouring would be pretty good for this time of the year as well.

I think it works nicely with black tights and boots. As you can see, we’re experiencing some very snowy weather here in London!

Here’s a view of the back.

As you might have guessed it took me nearly as long to cut the dress out as it did to sew it together! At first glance, close up, the print looks like random dots but as soon as I took a long look at it I realised that the zig zags were very prominent and so it needed some careful cutting to match it all and make sure that the zig zags were straight. I cut all the pieces in a single layer and, in the end, I was pretty happy with the overall effect.

This is the pattern I used


It’s not the first time I have made this pattern but my last version looked very different because then I made the sleeveless, maxi-length view (blogged about here), which turned out to be one of my favourite summer dresses and was perfect for hot weather. I kept meaning to make another one but this time I decided to give the dolman sleeve style a try and I really like it. On the pattern envelope it's the photograph at the bottom right but I didn't use a contrasting fabric for the midriff section, only for the neck band (being short I have to think carefully about cutting myself in half!). The dress is so easy and comfortable to wear and I love the flappy sleeves.

If you’re looking for a dress that can be worn very casually or dressed right up, I really do recommend this pattern. I can definitely see myself making a few more of these.

I think the next few days are going to be busy with gift wrapping and baking and festive decorating but I am hoping to get in a little bit of sewing to keep me from going Christmas crazy! I do hope your preparations for Christmas and your holiday season sewing are all coming together nicely?

Friday, 17 September 2010

Another Simplicity 'Amazing Fit' dress finished!

I’ve plunged into my fall/autumn sewing by making myself an essential wardrobe staple – a little black dress.

I used what is rapidly becoming one of my favourite patterns – the ‘Amazing Fit’ dress, Simplicity 2648. My first version, blogged about here, was in a vivid orange. This time, hurrah, I remembered to attach the belt so I could make use of a nice looking black buckle that I have had in my stash for a while. Here’s a close up of the belt and buckle.


The fabric is a double knit, purchased from Gorgeous Fabrics. This is my first time working with double knit fabric and I have to tell you that I LOVE it. I really like how you can use it for a pattern that is designed for a woven but it has a nice bit of stretch and doesn’t wrinkle or crease. You can put it in the washing machine and it’s so practical and comfortable, great for travelling. You can use it to make a casual looking dress or even something quite dressy and smart. Also it’s easy to sew with. I’ve been asking myself, why have I never used it before?

I made the orange version of this dress unlined, as per the pattern instructions, which worked out fine but I did have to give the neck and armhole facings a really fierce steam pressing to keep them lying flat. For this version, as the fabric wouldn’t have taken well to a hot steaming, I decided that I would do away with the facings and line the bodice with a thin tricot. That way I got a clean finish with the edges but also kept the stretch factor of the double knit. Here’s a picture of the inside of the dress.


So, autumn garment number one has been completed and I think it’s going to be a very useful wardrobe basic!

Next up is the Jalie scarf collar top. I have seen lots of gorgeous versions of this top, and I am fascinated by the construction technique for the collar, so I am really keen to give it a try. I have cut it out in a lovely deep pink rayon and silk jersey. More soon …….

Friday, 3 September 2010

The thrill of a frill - Simplicity top finished!

Bearing in mind my weakness for frills and ruffles and my great liking for patterns that offer separate pieces for B, C or D cup sizes, I really don’t know why I didn’t get around to making up Simplicity 2599 earlier. This pattern has been sitting around in my stash since it was issued last year – as soon as I saw it I leapt on it. And I’ve had the coral coloured silk I planned to use for it since the spring of this year. All summer I kept meaning to make it but, somehow, it never reached the top of the pile - until now. But, as they say, better late than never and here it is

In case you’re wondering, I’m wearing it with the skirt I made from the April issue of Burda Magazine (blogged about in this post). So I’ve got ruffles at my neck, a flounce round my hem and a bow at the back! Is that too much?

The top is pretty easy to make but the ruffles do take a bit of fussing with to get just right, especially with a slippery silky fabric. As I mentioned in my last post, I tried out a new technique to make this easier and did the gathering of the ruffles with my new best friend, my serger. This way the ruffles get the edges finished at the same time as the gathering threads are put in – you then just pull up the needle threads to adjust the ruffles to the exact length you want them and sew them to the front. Here’s a close up of the ruffles

And here’s one with a ruffle lifted up so you can see how it is attached to the front.

At the back of the neck there is a button and loop closure. If you want to make this top quicker you could actually do without this (I can take the top on and off without undoing the button). However, I like the elegant look of the closure and I found some cute looking rose shaped buttons in my button box (I have no idea where they came from – do things mysteriously appear in your home?!), so I used one of them


I think that this pattern is definitely worthy of another outing at some time in the near future but, in the meantime, I’m starting to think that summer sewing has to stop now …… I need to do some serious planning for my autumn (fall)/winter wardrobe.

Thursday, 19 August 2010

Simplicity 'Amazing Fit' dress - finished!

Fortunately I recovered from my mishap with this dress (confessed to in my last post) pretty quickly and now, of course, I’m telling myself that I really do love the tab and buttons. Isn’t it funny how we Sewists can so quickly adapt and think positively? A ‘foolish mistake’ can become a ‘design decision’ and so we find ourselves with a dress we love.

Anyway, put some sunglasses on, because here it is


That orange is pretty dazzling isn’t it? In the summertime I’m a sucker for bright colours – orange, yellow, throw in a bit of hot pink and I’m happy!

The fabric is a cotton pique that I purchased from Elliott Berman in New York and I think it’s just right for this style – it’s soft but not too thin, it has some body but isn’t too stiff. Normally I’m a bit of a lining fiend but, as the pattern didn’t call for a lining, and I felt this fabric would be good on its own, I have made it unlined.

The pattern is Simplicity 2648 and the instructions are interesting – I think they’re either genius or annoying, depending on what you want. It’s an ‘Amazing Fit’ pattern so they give you loads of helpful instructions on how to get the fit just right but in order to do this they ask you to baste the whole dress together, make your adjustments, then TAKE IT APART and sew it together again DIFFERENTLY. What I mean by this is that you baste the front bodice and front skirt together then you baste the back bodice and back skirt together and then baste front to back (so it’s easy to fit down the sides). Then you take it apart and sew it together the more usual way – i.e. sew the bodice, then sew the skirt, then join the two together. It’s great if you need to be guided through the fitting process.

Personally, I didn’t do it that way. I bought the pattern because it has separate pattern pieces for A, B, C or D, cups (always a big selling point for me!) and, of course I really liked the style. I like the close-fitting princess seam bodice and I like that the skirt front has two vertical seams with no darts. I did the fitting by making a muslin. I am such a weird shape that I usually have to make all sorts of adjustments that wouldn’t be so easy to make later, once the nice fabric was cut. However, as long as you are prepared to sort out which part of the instructions you want to follow and which you want to ignore, then I really recommend this pattern.

Before I go, here is a close-up of that button tab that I’ve grown to love so much

But next time I make this pattern I’m going for the version with the belt because I think I’m going to love that too. Hey, I’m easy to please!

Friday, 13 August 2010

Oh, I could kick myself!

Note to Self: When making a garment, please READ THE INSTRUCTIONS. You may think you know how to do it but a little glance at the instructions as you go along really will save upsets. Yes, like that nasty moment we had yesterday!

Readers, I’m making this dress, from Simplicity 2648.

I decided to make the sleeveless version with the round neck (like the drawing on the bottom left) but with the little fake belt with the buckle at the front (like the drawing in the middle). Having altered my pattern for an ‘Amazing Fit’ and cut out my fabric I was pretty excited and all set to go. I sewed the bodice front to the side fronts, made the darts in the bodice back, sewed the back to the front at the shoulders and side seams, checked the fit – great, and then serged all seams. Then I noticed some pieces sitting on the table, yep, the belt pieces!

Now any reasonably experienced sewist will probably know that sewing the belt pieces to the bodice front is the FIRST thing I should have done, before sewing the front to the side fronts. Actually, I did know this myself because I had, at some point in the last week or two, read the instructions and, thank you Simplicity, they couldn’t have been clearer. It’s just that I never bothered to look at them again when it came to actually sewing the thing and I FORGOT the belt pieces.

I hate to unpick a serged seam but I would have done it if it hadn’t been for the fact that my cotton pique fabric, lovely as it is, ravels a lot and, because it was a curved princess seam, I had serged it right next to the seam stitching. I feared that an attempt to take it apart would end in disaster.

So, alas, no little belt with a nice buckle. I really wanted that little belt. Instead it’s going to have to be the tab with the two buttons (like in the main photo on the pattern). Fortunately sewing and attaching that tab is the last thing you have to do. So, now I’m off to buy some buttons!

In the meantime, have you ever forgotten a crucial sewing step – please tell me that I’m not the only one?!

Thursday, 5 August 2010

Simplicity dress - version two completed!

In my last post I promised a second version of Simplicity 2403 and here it is -

This dress started out with a piece of fabric at Metro Textiles (in New York), seized upon during my recent shopping trip there with Carolyn, Elizabeth and Opal (thanks to you all for your valuable input on my choice). There was only just over a yard left but I thought, that’s fine, it will make a very nice skirt and, at $5.00 for such a good quality piece of stretch cotton, it’s a bargain.

Later, (in New York Elegant Fabrics) I happened to chance upon a piece of cotton lawn that perfectly matched the aqua/mint shade in the print. So I thought, great, that will make a nice little blouse to go with the skirt. Next I found myself in M & J Trimmings and chanced upon some grosgrain ribbon that was exactly the same colour. And that’s when it came to me. Forget this separate skirt and blouse idea - why not use the Simplicity pattern I had just used for my last dress to combine both fabrics into a shirtwaist dress?

I have to say that when I got back to London my heart did sink a little at the prospect of making another version of this dress because (as I moaned in my last post) there is a lot of work with this pattern. However, my enthusiasm for the project overcame my reluctance. This time I decided that I wouldn’t have the tie belt but instead I sewed grosgrain ribbon onto the middle of the waistband before attaching it to the dress. I also decided to add the front ruffles that are one of the ‘designer additions’ included in the pattern.

Ah, yes, the ruffles. They nearly defeated me. The pattern has you cut four ruffle pieces and you’re supposed to narrow hem each of them, then place them one on top of each other in pairs – two for the left side and two for the right side. Now normally I’m not too bad at narrow hemming but the fabric was very fine and the pieces were small and the curves at the bottom were very curvy! Readers, it was horrible. I tried several times but in the end I just had four sad chewed up little rags – definitely not fit to be sewn down my front! Now, of course, I could have just binned the ruffles and gone without but I WANTED RUFFLES!!

Then it came to me. I cut four more ruffles but this time I sewed them together in pairs with the right sides together then turned them right sides out, pressed them and, voila, beautiful ruffles. So what I have is one double layered ruffle either side, rather than two single layer ruffles either side. Here’s a close up of the bodice –


So, there it is. Conceived in New York, fashioned (with a lot of faffing) in London - another dress came into the world and I like it quite a lot.

Thursday, 29 July 2010

So where is that Simplicity dress I said I was making?

Before I set off for my New York trip I mentioned that I was feverishly working to finish Simplicity 2403 and I’m sure that you are all wondering – did she ever finish it? And, if so, where is it?

I am pleased to report that, yes, I did finish it and, to prove it, here is a picture of me hanging around the streets of New York wearing it.

The pattern is this one -


As with all the Project Runway patterns there are a whole lot of style variations to choose from. My version has the stand collar and the waistband has tie ends (I used a piece of black cotton that I had in my stash for this).

Here is a closer picture of the bodice –


The pattern doesn’t call for a lining but I added a lightweight one to the skirt part only, just to add a bit of extra body to the cotton fabric and to make sure it wouldn’t be see through or cling to my legs! Here’s a picture of inside the dress.

I pretty much followed the pattern instructions except that I used an invisible zipper instead of a regular one and instead of using purchased bias binding for the armholes I made my own from the dress fabric remnants. Oh, and I omitted the slit that is supposed to go on the left hand side of the skirt – I just didn’t feel it would look right and the skirt definitely doesn’t need it for walking in.

This dress isn’t difficult to make but there is a LOT to do. The front has princess seams; the back has a yoke with a gathered bodice; there are front bands with buttons and buttonholes; a stand collar; the waistband needs attaching to the bodice with its facing; the skirt has inset pockets and pleats at the front and darts at the back; the skirt (and the lining) has to be attached to the waistband, a side zipper has to be inserted, the armholes need binding, the waistband ties have to be made and attached and, finally, you can hem the skirt.

Phew! Was it worth it? Mmm, I think so.

In fact, I have already embarked on a second, but quite different looking, version and I’m hoping to finish that very soon ……..
Related Posts Plugin for WordPress, Blogger...